Showing posts with label Pie. Show all posts

Thursday, October 22, 2015

How To Make A Super Flaky Pastry (for puffs and pies)

 
I used this pastry to make curry puffs and chicken pot pie.  This is one hell of a super flaky pastry.  Looking at the flakes will just leave you all excited and go bananas for a while.  Frankly, as a newbie to baking and not a trained cook/baker, I am not sure whether this is a puff pastry or not.  Whatever it is,..........I know that this IS a PASTRY,......... that makes a commendably great recipe. 

Before you scroll down any further, I wish to caution you that the explanation in this post is rather lengthy involving lots of steps.  I can't seem to find ways to simplify it any further.  If this is your first time making a puff pastry or something similar, be sure that you read everything very carefully.  I do recommend that you read the steps a few times to get the whole process digested and visualized before getting your hands dirty. 

I have also used color codes on the words to ease readability and understanding:
  1. Red indicates you need to let the dough rest for 20 minutes. By knowing this, it helps you plan your work more easily.
  2. Blue indicates the ingredients used. 

INDGREDIENTS:

600g plain flour
1 egg (beaten)
250ml warm water (not hot)
1 tsp salt
1 tsp yellow colouring (I used turmeric powder to get the yellow hue)
200g pastry margarine


STEPS:

Basically, making the pastry involves 3 steps : 
 
A) Making the dough
  • Combine warm water, salt and colouring in a bowl and mix until salt dissolves.
  • Combine flour, egg and water in another bowl and mix just until the mixture forms a dough. Do not overmix. Don't worry if  there are still specks of flour in the dough as they will 'disappear' after the rolling and folding process. 
  •  Cover dough with plastic and leave it to rest for at least 20 minutes.  

B) Preparing the pastry margarine
  • While the dough is resting, place the pastry margarine on a plastic.
  • Place another piece of plastic on the margarine. 
  • Roll out the margarine evenly into a rectangle. Leave aside.

C) Rolling and folding the dough
  1. Roll out the dough into a rectangle about 1cm thick, as evenly as possible. Then place the rolled-out pastry margarine on one side of the dough. (Pic 1)
  2. Fold dough into 2, just like you would close a book. (Pic 2)
  3. Press the edges to seal.  Cover dough with plastic & leave to rest for at least 20 minutes. (Pic 3)
  4. Turn dough at 90 deg. Then roll dough into a rectangle.
  5. Divide the rectangle vertically into thirds,  marking the dough lightly with the edge of your hand. Fold  the first third of the dough, overlapping the second third (Pic 4)
  6. Then fold over the last third of the dough overlapping both the 1st and 2nd thirds, brushing away the excess flour from the inside as you fold.  You should be getting a long vertical rectangle facing you. (Pic 5)
  7. Next, divide the dough into thirds again, this time from top to bottom.  Take the 1st third (right on top) and fold, overlapping the 2nd third.  (Pic 6)
  8. Now, take the last third and fold, overlapping the 1st and 2nd thirds to form a square. (Pic 7)  Cover dough with plastic and leave to rest for at least 20 minutes.
  9. Roll out the dough into a rectangle again. Repeat Step 5 & 6.
  10. Now, divide the dough into thirds again, from top to bottom. Then, cut the dough. (This step is just like step 7 except that this time the thirds are cut.) 
  11. Place the bottom third onto the middle third & followed by the top third. You'll end up with a tall squarish dough. (Pic 8) Cover dough with plastic & leave to rest for at least 20 minutes.
  12. Using a knife & a ruler, divide the dough into small squares and make markings on the dough. (I divided it into 16 squares.  Then carefully cut the small squares. (Pic 9)  At this stage, you can divide and cut into any sizes as you like, depending on what you are using it for.
  13. Refrigerate for a while and here you go..........the dough is ready for use!

    Wednesday, May 7, 2014

    Curry Puffs (Karipap)


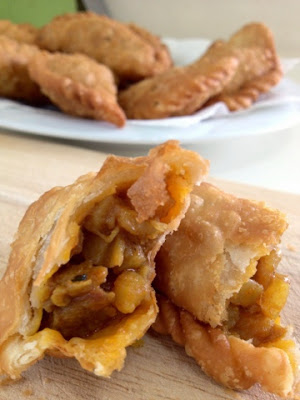
    Curry puff is an Asian snack commonly found in Malaysia, Singapore and Thailand.  It is basically a deep-fried small pie made of pastry shell and stuffed with curried potato cubes and diced chicken meat.  I am proud to say that I grew up eating lots of them.  Needless to say, this is one of my all-time favourite childhood snacks.  Who doesn't love curry puffs, anyway?

    Until today, this savoury snack is not showing any sign of slowing down or being forgotten.  It is still widely found in any Malay warungs (a small modest family-owned restaurant) or even in any makeshift stalls along roadsides selling pisang goreng (banana fritters).  These two local snacks are really like brother and sister.  Where there is pisang goreng, there is karipap, for sure. 

    It is commonly eaten during breakfast or afternoon tea.  It goes really well with a cup of hot coffee/milk tea but I like it better with a glass of iced orange juice especially on a scorching afternoon. 


    This is my first attempt making karipap and I am absolutely pleased with the outcome.  I personally like this recipe a lot, thanks to Sonia of Nasi Lemak Lover, who has quite made a name in food blogging, where Asian food is concerned.  I invite you to see her recipe here.  I especially love the pastry.  To me, this is the exact texture I have been looking for.  It's  smooth, cripsy and most importantly flaky.  Just like making pineapple tart pastry, two rules of thumb you have to follow in order to produce a flaky pastry, they are:
    1. USE cold butter and work quickly before the butter melts, so try avoid using your bare hands when mixing the flour and butter as we do not want the heat from the hands to melt the butter.  So?  Use fork;
    2. DO NOT knead the dough, quickly bind it together with your hands.
    So, if you wish to give this recipe a try, here are the ingredients and method:


    Curry Puff (Karipap)
    makes about 15 big pcs 

    Pastry
    185g all-purpose flour
    35g rice flour
    35g corn flour or tapioca flour
    35g butter (salted)
    35g cooking oil or vegetable oil
    90g icy cold water

    Filling
    450g potato, peeled and diced
    1 medium onion, diced
    200g chicken breast (cut into small pieces, marinate with 1/2tbsp curry powder)
    1/2tbsp red chili powder 
    1tbsp curry powder (chicken flavour)
    3tbsp vegetable oil
    3 sprigs curry leaves
    1 cup water (+/-)
    1tsp salt
    1tsp chicken powder
    1tsp fish sauce

    Method
    To cook filling
    1. Heat oil in wok, add in curry leaves and onion. Saute onion until translucent then add in potato.
    2. Cook until potato has changed colour on the edges then add chicken breast, stir fry for 1-2mins then add in curry powder and chilli powder. Add water and bring to boil.
    3. Add salt, sugar, chicken powder & fish sauce to taste, then turn the heat down and cook until potato is soften and the liquid has reduced and form a dry paste. Cool completely before use. 

    Pastry
    1. In a large mixing bowl, bring 3 types of flours together and mix well. Set aside.
    2. Rub in butter with flours until crumble, then add in cooking oil, to mix well.
    3. Pour icy cold water over flours, mix thoroughly with a wooden spatula in the mixing bowl. Then, lightly knead till soft dough, do not over work. Cover dough with plastic wrap and rest for at least 15 minutes. 

    To assemble- Divide and shape dough into 13g each ball. Then roll out each ball into a 8-10cm circle, wrap in potato filling. Pinch edges to seal, then deep-fry in medium hot oil until golden brown.


    Sunday, November 10, 2013

    Crusty Apple Pie


    I was looking for a pie recipe when I stumbled upon this lovely blog over here by Alice of I Love. I Cook. I Bake.  Her photos and write up, though short and simple were just sufficient to capture my attention, kept me drooling and eventually set my heart on trying this simple yet tantalizing classic dessert.

    What exactly caught my eye on this recipe was the fact that it called for cream cheese for the crust.  As far as I am concerned, people normally use either vegetable shortening or butter.  But cream cheese? This is surprisingly interesting, something new and rare to me.  Apparently, it was said that the cream cheese was the main thing that made the pie so very crispy and crusty.  And for this particular reason, I was dying to give this dessert a shot.

    All in all, it was a pretty easy bake.  Straightforward.  Nothing complicated.   As both me and my wife are never an apple pie fan and knowingly that none of my kids has actually tried this dessert, I dared not take the risk and wisely halved all the ingredients, otherwise (if the bake didn't turn out right), I would have my three meals stuffed with only apple pies.  As such, I made a cutie 6-inch pie.  No pie pan used, just laid it on the baking tray.

    Well, I was somehow lucky that I made the correct decision - making a mini version. Reason?  The pie did not turn out to be what I had expected.  I did not seal the crust well.  The juice from the apples leaked while baking and as a result the pie was a little on the dry side.  I had expected the filling to be a little slushy.  How I wished that when I slit cut the pie, the apple sauce just immediately sloshed out.  Don't you think that's heavenly?  Well, other than these minor hiccups, the rest was just perfect.  The apple slices were baked to perfection, they are soft tender. The crust was creamy and flavourful.  Since the pie was a little dry, I complemented it with a dollop of vanilla ice-cream.  Aaah.......sinfully blissful!

    Wanna try?  Here's the secret........  

    The Recipe: 
    (Yield: one 12" pie) 

    The Crust

    • 2 cups all-purpose flour
    • 3/4 teaspoon salt
    • 2 tablespoons buttermilk powder, optional*(I omitted this)
    • 1/2 cup cream cheese
    • 10 tablespoons cold butter
    • 3 to 4 tablespoons ice water

     The Filling

    • 1/2 cup Baker's Cinnamon Filling mixed with 2 tablespoons water*
    • 3 medium-to-large fresh apples, peeled, cored, and thinly sliced
    • dash of salt
    • 2 teaspoons lemon juice
    • 2 tablespoons butter, cut in small cubes
    • *Substitute 1/2 cup granulated sugar and 2 teaspoons ground cinnamon for the Baker's Cinnamon Filling and water, if desired. If you use sugar and cinnamon, DO NOT ADD THE WATER.

    The Topping

    • 2 tablespoons coarse sparkling white sugar

     Direction

    1. To make the crust: Put the flour in a bowl, or in the work bowl of a food processor. Add the cream cheese, salt, and buttermilk powder. Mix together until everything is evenly crumbly. If you're using a food processor, just a few quick pulses are all you'll need.
    2. Cut the cold butter into pieces and work it into the flour, leaving some visible pieces.
    3. Sprinkle the dough with the cold water and toss. Squeeze the dough to determine if it holds together. If it's too dry, add water 1 tablespoon at a time, using just enough so the dough will hold together.
    4. Divide the dough in two pieces, one slightly larger than the other. if you have a scale, one piece should be about 9 ounces; the other about 10 ounces. Flatten each piece of dough into a disk, wrap well, and refrigerate for 30 minutes or longer.
    5. Remove the larger piece of dough from the refrigerator, and roll it into a 13" circle. Place it in a 12" shallow pizza pan, or onto a parchment-lined baking sheet. The parchment is there to catch any spills and simplify cleanup; if you don't have it, there's no need to grease your pan.
    6. Spread the Baker's Cinnamon Filling mixture atop the crust. If you're using sugar and cinnamon, simply sprinkle it evenly atop the crust.
    7. Arrange the apples in concentric rings atop the filling. Or, if you don't feel like being that fussy, simply spread the apples over the crust.
    8. Sprinkle the apples with a dash of salt, and drizzle with the lemon juice. Scatter the bits of butter over all.
    9. Remove the other piece of dough from the refrigerator, and roll it into a 12" circle. Place it atop the apples. Bring the edge of the bottom crust up over the top, pressing to seal.
    10. Brush the crust with milk, and sprinkle with coarse white sparkling sugar, if desired. Cut a dime-sized hole in the middle; or cut several 1" slits across the top, for steam to escape.
    11. Bake the pie in the preheated 425°F oven for 15 minutes. Reduce the heat to 375°F, and continue to bake for an additional 25 to 35 minutes, or until the crust is golden brown and you can see some filling bubbling through the slits in the top.
    12. Remove the pie from the oven, and wait about an hour before cutting into wedges and serving.