Tuesday, May 27, 2014

Nyonya Chang


Here it is my very first bold attempt making this traditional Chinese classic or zongzi in Mandarin, chang in Hokkien and dumpling in English.  Frankly, I can't really believe that I have come this far making changs.  What satisfies me the most is I went about doing everything on my own without the accompaniment of any experienced elder.  I was all alone throughout the whole making process from buying the ingredients, cutting the meat, making the filling, tying the dumplings to boiling them.  To tell you the truth, I've never bought pork from a butcher before and obviously communicating with the not-so-friendly rough-spoken Chinese butcher in Mandarin is quite a daunting task for me.  I didn't even know what is pork belly called in Mandarin but luckily Google Translate saved the day. 

Of course, I find wrapping and tying the dumplings the most challenging task.  It all happened on a dark stormy night when rain was beating like bullets, lightnings were flashing rather frighteningly and thunders were booming angrily, I was all alone sitting in my living room wrapping and tying my dumplings.  Hey, I'm not making up the whole scene okay but coincidentally this was what exactly happened that night.

After my wife and kids slept, I went downstairs, quickly set up my work station and began wrapping my dumplings accompanied by nobody except for a few virtual elderly aunties who appeared on my laptop screen showing me the way to wrap and tie the dumplings.  While wrapping I was looking at the demonstration video clips via YouTube.  Very true, it's easier seen than done!  Immediately, I felt like giving up.  The first dumpling I tied crashed down on the floor scattering all the grains and fillings.  At that spur of the moment, my heart crushed and a surge of loneliness sipped in.  While I was cleaning up the mess, suddenly I thought of my mom.  How I wished she was beside me showing and guiding me how to tie dumplings.  However, I went on to pick the bits and pieces of the grains including my crushed heart.  Staying strong, I continued and and eventually pulled it through.  I am now on my third batch of my dumpling making project. Yipee!


Okay, now back to my nyonya dumpling.  I chose this recipe simply for the reason that it was Amy Beh's, a well-known celebrity chef and newspaper columnist in Malaysia.  With her accolades, I  thought how wrong could I go with her recipe?  Browsing through the ingredients and after having a word with my tua ee (eldest auntie), YES I was on the right track.  Based on my tua ee's input, I made slight modification to the recipe.  I made it sligthly more flavourful after I was told that the taste would be blander during the boiling process. 

Overall, I am absolutely glad that everything particularly the taste turned out well.  I benchmarked it with my tua ee's dumplings and what I got was to me that of what I have been eating all these years.  However, one setback, mine was not as nice-looking as that of my aunt's.  Hers was clean-looking with a striking blue hue on top whereas mine was rather murky and not that appetizing.  So, this leaves me with lots of rooms to improve.


Recipe - Nyonya Chang
Source : Kuali.com (Amy Beh)
Yields approximately 15 big dumplings

Ingredients
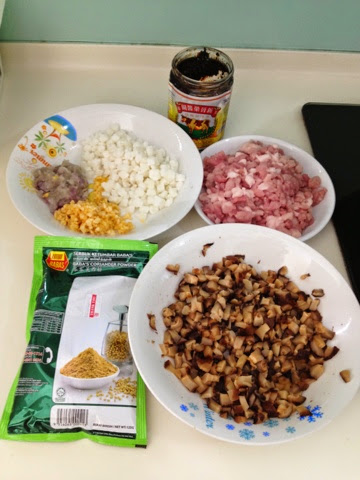
  • 700g glutinous rice 
  • Some screwpine leaves, cut into 4 cm lengths
  • Dried bamboo leaves, washed and boiled until soften 
  • Hemp strings for tying
  • 2 tbsp salt
  • 1 tbsp sugar
Filling
  • 5 shallots, minced (I used 7 shallots)
  • 2 tbsp chopped garlic
  • ½ cup oil 
  • 3 tsp preserved soya bean paste (tau cheong)
  • 7 tbsp coriander powder (ground ketumbar), mixed with 170ml water into a paste (increased to 8 tbsp)
  • 450g belly pork, skin removed and cut into very small cubes
  • 12-14 dried mushrooms, soaked and diced
  • 100g candied winter melon, diced (increased to 150g)
Seasoning (combined)
  • 3 tsp pepper
  • 5½-6 tbsp sugar or to taste (replaced with brown sugar, 6-7 tbsp)
  • 1 tbsp thick soy sauce (2 tbsp)
  • 1 tbsp light soy sauce (2 tbsp)
  • 2½-3 tsp salt or to taste
  • ½ tsp ground black pepper

Method

To prepare rice (I apportioned the rice to tinged some blue with the blue pea flower)
  1. Boil some water together with 30 blue pea flowers to get blue tinged water.
  2. Soak 200g of the rice with this water for at least 3 hours.
  3. Soak the rest of the rice with water at the same time.
To prepare the filling
  1. Heat oil in a non-stick pan, fry shallots and garlic until aromatic. Add soya bean paste and coriander paste. Fry until fragrant.
  2. Add pork, winter melon and mushrooms, and mix in combined seasoning. Fry until pork is heated through. Dish out and set aside.
To assemble the dumplings
  1. Drain the glutinous rice and briefly rinse the rice.
  2. Overlap 2 bamboo leaves lengthways then fold into a cone. 
  3. Fill in this order into the cone-2 tbsp blue glutinous rice, 2 tbsp filling, 2-3 tbsp white glutinous rice.
  4. Cover with a piece of screwpine leaf. Press down to compress the dumpling. Wrap into a pyramid shape. Tie tightly with hemp string to secure. Repeat until all the ingredients are used up.
  5. Bring a large pot of water to a boil. Add salt and sugar then put in the dumplings and immerse them completely. Cook in rapidly boiling water for 2-2½ hours. Remove the dumplings and hang them to drain off excess water.

Thursday, May 15, 2014

Fried Oyster Omelette


Fried Oyster Omelette is another famous street food in Asia.  It is said that this is a must-try hawker food when one visits Asia and this is the reason why this food has been constantly ranked as one of the most sought-after hawker food in Taiwan.  This Chinese dish is widely found in many parts of Asia including Malaysia, Singapore, Thailand and the Philippines.  Easily found in night markets, this is one heck of a dish to die for.  It is savoury, creamy, zesty, chewy, some gooey and some crispy! 

In Malaysia, it is commonly called Oh Chien, literally means fried (chien) osyter (Oh) in the Hokkien dialect.  This dish is easily available in any foodcourts in Penang and Malacca (where I'm currently residing). 

Needless to say, I really have weakness for this food where I got infatuated with it when I was seven, if I may recall.  I could still remember how my mom and my uncle used to occasionally bring back this food nicely wrapped in a sheet of plastic and newspaper.   Though closely wrapped, the aroma would somehow make its way out wafting the air and I would be like YES!  Mom knew very well that I loved it so much that she boldly tried frying one plate for me.  The result was quite shockingly disastrous where all I got was a big lump of starch clumped together.  I did not want to disappoint her, so I tried to pretend that it was okay and edible.  Somehow or other, my innocent expression failed to cheat and convince her!

Whatever it is, this dish is truly a comfort food for me until today.  The combination of omelette, starch, fresh oysters and sprigs of fresh coriander leaves with a zest of squeezed lime juice just blend so beautifully making the dish deliciously sublime and leaving you totally perked up.

Surprisingly, this dish is so easy to prepare.  Not many ingredients involved.  They are quite easily available except for the oysters where you may have to buy them fresh from the morning market and at times it could be hard to come by.   Preparation only takes less than 10 minutes and frying only eats a miniscule 5 minutes.  So, barely 20 minutes, a plate of vibrant looking and savoury Oh Chien is already sitting nicely on the table ready to fire your palate and appease your appetite.

I got the recipe from Kenneth Goh of Guai Shu Shu in which he gave a very well write up on the dish.  Of course, there are aplenty of them on the net but Ken's photos somehow caught my hungry eyes.  The photo shots were spot on.  The colours looked deliciously vibrant making the dish looked irresistibly tempting.  Everything was perfect, just the exact type of fried oyster I used to eat when I was just an innocent young boy.

So, for those of you who have not had this dish before, I highly recommend that you give it a try.  Certainly, you don't have to be physically here in Asia, just scroll down and you will have this delectable Asian treat right before you, in your humble kitchen.    

The Ingredients:
(makes one big plate, as per picture)
  • A handful of fresh oysters or defrosted frozen oysters
  • Some spring onion (chopped separately for the white portion and green portion)
  • 2 cloves of garlic 
  • 2 tablespoons of tapioca starch or corn starch  or sweet potato starch
  • 1 tablespoon of rice flour
  • 2 tablespoons of fish sauce
  • 1/2 teaspoon of white pepper
  • 2 tablespoons of cooking oil
  • 10 tablespoons of water
  • 4 eggs, lightly beaten
  • Some sprigs of coriander leaves for garnish

The Steps:
  1. Defrost the frozen oysters completely, wash carefully in cold water and drain well.
  2. Mix the tapioca/corn/potato starch and rice flour together with the water to make a watery starchy solution.  Set aside for later use. 
  3. Heat the frying pan with 2 tablespoons of oil.  Stir fry the white portion of the spring onion and garlic until fragrant.  
  4. Pour in the starch solution until the batter is half cooked (about 15 seconds)
  5. Add in the beaten eggs and when the eggs are almost cooked, add in seasonings (fish sauce and white pepper).  Stir until well mixed. 
  6. Add in the fresh oyster and stir fry for another one minute. 
  7. Off the heat and garnish with coriander leaves or spring onions (the green portion)
Note: Best served hot as a snack with homemade garlic chilli sauce and squeezed lime juice.

 Bon Appetite!

Wednesday, May 7, 2014

Curry Puffs (Karipap)


Curry puff is an Asian snack commonly found in Malaysia, Singapore and Thailand.  It is basically a deep-fried small pie made of pastry shell and stuffed with curried potato cubes and diced chicken meat.  I am proud to say that I grew up eating lots of them.  Needless to say, this is one of my all-time favourite childhood snacks.  Who doesn't love curry puffs, anyway?

Until today, this savoury snack is not showing any sign of slowing down or being forgotten.  It is still widely found in any Malay warungs (a small modest family-owned restaurant) or even in any makeshift stalls along roadsides selling pisang goreng (banana fritters).  These two local snacks are really like brother and sister.  Where there is pisang goreng, there is karipap, for sure. 

It is commonly eaten during breakfast or afternoon tea.  It goes really well with a cup of hot coffee/milk tea but I like it better with a glass of iced orange juice especially on a scorching afternoon. 


This is my first attempt making karipap and I am absolutely pleased with the outcome.  I personally like this recipe a lot, thanks to Sonia of Nasi Lemak Lover, who has quite made a name in food blogging, where Asian food is concerned.  I invite you to see her recipe here.  I especially love the pastry.  To me, this is the exact texture I have been looking for.  It's  smooth, cripsy and most importantly flaky.  Just like making pineapple tart pastry, two rules of thumb you have to follow in order to produce a flaky pastry, they are:
  1. USE cold butter and work quickly before the butter melts, so try avoid using your bare hands when mixing the flour and butter as we do not want the heat from the hands to melt the butter.  So?  Use fork;
  2. DO NOT knead the dough, quickly bind it together with your hands.
So, if you wish to give this recipe a try, here are the ingredients and method:


Curry Puff (Karipap)
makes about 15 big pcs 

Pastry
185g all-purpose flour
35g rice flour
35g corn flour or tapioca flour
35g butter (salted)
35g cooking oil or vegetable oil
90g icy cold water

Filling
450g potato, peeled and diced
1 medium onion, diced
200g chicken breast (cut into small pieces, marinate with 1/2tbsp curry powder)
1/2tbsp red chili powder 
1tbsp curry powder (chicken flavour)
3tbsp vegetable oil
3 sprigs curry leaves
1 cup water (+/-)
1tsp salt
1tsp chicken powder
1tsp fish sauce

Method
To cook filling
1. Heat oil in wok, add in curry leaves and onion. Saute onion until translucent then add in potato.
2. Cook until potato has changed colour on the edges then add chicken breast, stir fry for 1-2mins then add in curry powder and chilli powder. Add water and bring to boil.
3. Add salt, sugar, chicken powder & fish sauce to taste, then turn the heat down and cook until potato is soften and the liquid has reduced and form a dry paste. Cool completely before use. 

Pastry
1. In a large mixing bowl, bring 3 types of flours together and mix well. Set aside.
2. Rub in butter with flours until crumble, then add in cooking oil, to mix well.
3. Pour icy cold water over flours, mix thoroughly with a wooden spatula in the mixing bowl. Then, lightly knead till soft dough, do not over work. Cover dough with plastic wrap and rest for at least 15 minutes. 

To assemble- Divide and shape dough into 13g each ball. Then roll out each ball into a 8-10cm circle, wrap in potato filling. Pinch edges to seal, then deep-fry in medium hot oil until golden brown.


Wednesday, April 23, 2014

Grilled Chicken Thigh With White Wine Mushroom Sauce


This is one of my top favourite pasta dishes that I have ever prepared.  The sauce is light and creamy.  The taste of white wine is so apparent and it goes so nicely with the sauce.  Also, the chicken is simply delish and savoury.  Even the pasta itself is cooked al dente.  To me, all the ingredients just 'marry' one another so perfectly.  The chicken loves the sage.  The sage loves the mushrooms.  The mushrooms love the  sauce.  The sauce loves the pasta.  And more importantly, I LOVE THEM ALL!

I made two big batches of this during the Chinese New Year in February.  One for a group of my ex-students and the other just solely for myself.  Until today, I still have some of the sauce stored in my freezer.  Whenever I crave for it, I just bring it out and microwave it.  Just a matter of minutes, my ravenous appetite is pampered and satisfied.

One thing that made me really fall for this recipe is its calling for sage, a kind of herb that is hardly used in Asian cooking as compared to the more common ones like thyme, oregano, rosemary and peppermint to name a few.  Frankly, this is my first time tasting sage.  To me, it is just something like peppermint but less pungent.  Relatively mild.  Nice!

Whatever it is, I must thank Anyonita of Anyonita Nibbles for sharing this recipe.  You may find her write-up of this yummilicious dish here.  Well, for those who like pasta dishes, do give this arrangement a shot.  To put it simply, this recipe is just SIMPLE to the hands n TANTALIZING to the palate!     

The ingredients

The Chicken
3 pcs Chichen Thigh, deboned
Salt
Pepper
Fresh Sage, about a palmful, finely chopped

The Sauce
1 cup button mushroom, thinly sliced
Fresh Sage, about a palmful, finely chopped
Salt 
Pepper
Butter
1 can cream of mushroom 
1/2 cup white wine
1/2 cup water
1/4 cup full cream milk

Fettucine
Streaky bacon


The Methods 
1.  Rub each chicken thigh on bothe sides with salt, pepper and sage.  Marinate if for 30 minutes.
2.  Heat two tablespoons of  butter in a pan and saute the mushrooms until golden and crisp around
     the edges, about three to five minutes.
3.  Season the mushrooms well with salt, pepper and sage.  Set aside, leaving leftover liquid in 
     the pan. 
4.  De-glaze the pan with the white wine, swirling the pan until all the bits of leftover mushrooms
     and sage become unstuck from the bottom.
5.  Add in the cream of mushroom soup and water. Bring to boil.  Allow to bubble away until the 
     soup has reduced by about 1/3.
6.  Stir in the full cream milk, taste and adjust seasoning and add the mushrooms back.  Cover and
     let it simmer but not boil until ready to serve. 
7.  Place the chicken on the grill until cooked through.
8.  Meanwhile, make the fettuccine by following the instructions on the packet. 
9.  Once the chicken is cooked through and while it is still hot, rub with butter to give a nice glaze.
     Then, set aside.
8.  Cut the bacon into slices and saute with the remaining oil. Set aside. 
10. Serve the fettuccine first, followed by the sauce, topped with the and grilled bacon and 
      chicken. 


BON APPETITE!

Grilled Chicken Thighs with Easy White Wine & Mushroom Sauce
  1.  Rub each chicken thigh on both sides with salt, pepper and sage. Allow to marinate at least 30 minutes.
  2. Heat two tablespoons of the butter in a large pan and saute the mushrooms until golden and crisp around the edges, about three to five minutes.
  3. Season the mushrooms well with salt, pepper and sage. Set aside, leaving leftover liquid in the pan.
  4. De-glaze the pan with the white wine, swirling the pan until all the bits of leftover mushroom and sage become unstuck from the bottom.
  5. Add in the cream of mushroom soup and bring to the boil. Allow to bubble away until the soup has reduced by about 1/3.
  6. Stir in the double cream, taste and adjust seasoning and add the mushrooms back. Cover and let simmer but not boil until ready to serve.
  7. Place the chicken on the grill until cooked through.
  8. Meanwhile, make the fettuccine by following the instructions on the packet.
  9. Once the chicken is cooked through and while it is still hot, rub with butter.
  10. Serve the fettuccine first, followed by the sauce, topped with the chicken.
- See more at: http://www.anyonita-nibbles.co.uk/2014/01/grilled-chicken-thighs-easy-white-wine-mushroom-sauce.html#sthash.eKAzgJO5.dpuf

Monday, April 21, 2014

Ondeh-ondeh

 This is another classic dessert in Malaysia and Indonesia and very popular among the Malays and Peranakans.  It is called ondeh-ondeh in Malaysia but klepon in Indonesia.  It is basically a boiled rice cake, shaped into balls, stuffed with gula melaka (palm sugar) and rolled in fresh grated coconut.  Eaten as morning or afternoon snacks, this traditional dessert is very much liked by many, both locals and tourists.

Eating a ball of ondeh-ondeh can be quite suspenseful but delightfully satisfying.  When the ball is stuffed into the mouth, one is already anticipating that it is going to literally burst in any seconds.  Upon bursting, the palm sugar liquid is explosively oozed out from the ball sending a pleasing sweet sensation to the whole palate. 

I made this at home a couple of weeks back, after my successful attempt getting my daycare students to make ondeh-ondeh during the school holiday.  Though it was our first trial making this dessert, the outcome turned out to be surprisingly good receiving lots of thumbs up from the students and teachers alike.  I got the recipe from Mrs Tan, the cook for my daycare centre who is married to a Baba and loves exploring Nyonya cuisine.  A big THANK YOU to you, Mrs Tan!

One thing I like about this simple recipe which made my students ooh and aah that day is it calls for sweet potato, the secret ingredients that made the balls so wonderfully soft and smooth.  So, if you want to give this classic indulgence a try, here you go.......scroll down!


The Recipe:
(yields about 40 to 50 pcs)

350g glutinous rice flour
250g sweet potatoes
3 tbsp pandan juice (screwpine leaf juice)
1/2 tsp salt
3/4 cup plain water

200g gula Melaka (palm sugar), finely chopped
1 fresh grated coconut


Method:


1.  In a heavey saucepan, boil the sweet potato until soft and tender. Then, mashed and set aside.

2.  In a large bowl, combine the glutinous rice flour with Pandan juice and water.
     Then, knead lightly.

3.  Combine the dough with the mashed sweet potato and knead.

4.  Bring a pot of water to boil. Pinch a small piece of dough (about 15 g each) and flatten lightly.
     Fill the center of the dough with palm sugar.

5.  Roll them in your palm to form a smooth ball and cook the glutinous rice balls in the
     boiling water. When the rice balls float to the surface, remove them with a slotted spoon
     and shake off the excess water.
6.  Mix the grated coconut with a pinch of salt and steam for about 2 – 3 minutes and let it
     cool completely.

7.  Coat the rice balls with grated coconut and serve immediately.


HAPPY TRYING!

Thursday, April 17, 2014

Apom Bokwa With Banana Gravy

This is indeed a typical Baba-Nyonya (Straits-born Chinese a.k.a the Peranakans) dessert that is stepping into 'extinction'.  I only got to eat this whenever my septuagenarian aunt (tua ee) makes it.  I reckon that to many, especially those born in the 80s and below, this dessert is a childhood food that is bound to take you stroll down memory lane.

As a matter of fact, not many nyonyas now know how to make this classic cake (and pardon me, I am referring to today's young modern nyonyas, k!).  So, this accounts for the fact that this traditional kueh (cake) is so hard to come by nowadays.  As a Baba who currently lives in Malacca and loves cooking, I feel called to revive this dying classic.

Well, it all started when I was browsing through my Facebook News Feed a couple of days ago and suddenly someone posted a photo of this dessert.  It caught my eyes almost instantly.  Scrolling down on the comments made me realize that there were so many, both Malaysians and Singaporeans still craving for this dessert.  At the drop of a hat, I googled for the recipe.  Surprisingly, not many I could find except for Amy Beh's, an iconic figure where nyonya food is concerned.

I could have asked my tua ee or even my mummy for the recipe but I doubted they have it written down.  One thing for sure, they will confuse me with their 'agak-agak' (roughly) statement.  Whatever it is, come to think of it, my hats off to these elder nyonyas, anyway.  They just have all their recipes stored in their head without having to refer to any cook books. Just imagine how many of them and if you are a Straits-born, you will agree with me that Peranakan dishes are relatively complicated to prepare incorporating varieties of ingredients and spices.  Even their methods are not that straightforward.  And yet, all these are cleverly stored in their grey matter. RESPECT! RESPECT!

So, how's the verdict of Auntie Beh's recipe and my labour of love?  Generally, I'm very satisfied with what came out.  Though a little complicated with lots of steps to follow, I am indeed pleased with the outcome.  What I heard and gathered from my aunt and a few other elders was that to know as to whether you have succeeded in making the apom (pancake) or not was to look at the the tiny punctures on the surface of the apom.  The more the holes, the better the pancake.

And taste wise? Well, it was surprisingly close, though not exactly the same to that of my auntie's apom.  There is a slight tinge of sourish in the apom.  It could be from the yeast (I guess so, maybe someone can shed some light here!).  From my observation, the longer the rice batter is fermented, the sourer the pancake turns out to be, and the more the holes will form!  Anyway, not to worry, when the apom is dipped and blended together with the sweet banana gravy, it neutralizes everything and the result............HEAVENLY!


So, here I come, bringing you Amy Beh in the house, virtually......
 
Ingredients
By Amy Beh

I) The Cake/Apom
    (A)  Mix these ingredients together and leave aside to soak for 10 minutes:
            - 500g rice flour (I reduced it to 300g.  500g is just too much making it impossible to soak)
            - 25g glutinous rice flour
This is EBU
            - 300ml coconut water

     (B) Mix these ingredients, leave aside for 15 minutes.  Cook over 
           low flame until it turns gluey to make "Ebu":
           - 50g rice flour
           - 150ml water

     (C) Mix these ingredients and leave aside to froth:
            - 1/4 cup lukewarm water
            - 1/4 tsp sugar
            - 1 tbsp instant yeast
    
      (D) - 160ml pati santan (thick coconut milk)

II) The Sauce: 
      (A) Prepare the syrup
             - 75g brown sugar
             - 50g gula melaka
             - 175ml water
             - 3 pandan (screwpine) leaves 
       (B) Mix these ingredients together and allow the rice to expand:
             - 2 tbsp glutinous rice flour
             - 25ml water

       (C) - 50ml pati santan
             - 1/4 tsp salt
         
       (D) - 3 rippen bananas
     
  Method:

    Blend ingredients (a) and (b) together. Mixin 1/2 tsp salt and stir well with a hand whisk. Add in (c) and set aside for 30 minutes. Cover with a damp cloth for it to rise to double its size. 
    Blend in (d) and proof for another 50 minutes. Heat a brass apom mould and grease lightly with corn oil.
     
    Pour in enough batter to fill the mould three-quarters full and cook over medium heat. Cook till bubbles appear. Cover mould with a lid till the top part of the apom is cooked. Touch centre of apom with finger - if it is firm and not sticky, the apom is ready.
     
    To make sauce: Bring (a) to a boil, strain the hot syrup into (b). Stir well and transfer to a saucepan and cook over medium low flame. Add in (c) and (d) and stir well till sauce thickens. Pour sauce into a small bowl and serve with apom bokwa.
HAPPY TRYING!

Wednesday, January 15, 2014

Pandan Layered Cake


I made this cake two months back.  Yes, for TWO  MONTHS, I have had the draft sitting and idling in my to-publish list.  I think it's about time I get it shared out before everything gets slipped off and is completely forgotten. Indeed, publishing this post at this point of time is so untimely and odd because everyone is busy making and showcasing their festive cookies since Chinese New Year is just around the corner.  But, I have no choice.  Let me be the odd one this time!

Well, I have been 'hibernating' for quite a while.  For the past two months, I have been snowed under with loads and loads of work .  Ironically, school holidays are never a holiday for teachers like me who are working in an after-school care set up.  We normally get even busier during the school holiday, a period we always dread to think of or even cringe when we know that it is approaching. Just imagine students coming in as early as 8am to the centre and tagging with you until 6pm.  Argggh!  Entertaining them and keeping them busy for that long period of time is never an easy-peasy job and can sometimes be a little daunting.  I normally go back home completely drained.  At times, when I step into my kitchen, I feel so sorry for having to neglect my oven, stove, baking trays, measuring cups etc etc.

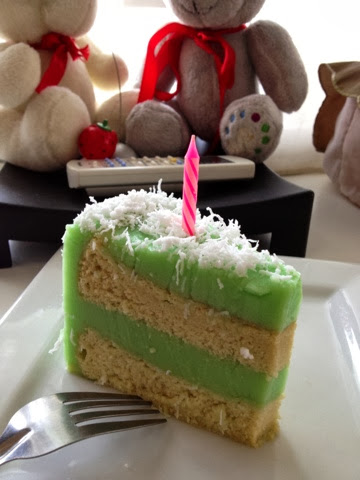
Now, back to my bake - pandan layered cake.  I have always loved this cake and one thing for sure, I only take it when it is chilled.  One thing the make this cake so wonderfully satisfying is the custard layer.  The aroma of the pandan extract and coconut milk just complement so perfectly.  The texture and the chillness of the custard also blend so perfectly well with the cake.  Every single bite is so smooth, refreshing, pleasing and irresistibly divine.  So, if you decided to give this gastronomical  delight a try, please scroll down for the recipe.        


Pandan Chiffon Cake
Adapted from Blessed Homemaker

Ingredients
(A)
4 Egg Yolks
40 g Castor Sugar
1 tbsp Pandan Juice
100 ml Coconut Milk
50 ml Corn Oil
Pinch of salt

(B)
100 g PrimaFlour Top Flour (I used plain flour)
1 tsp Baking Powder

(C)
5 Egg Whites
40 g Castor Sugar
1/3 tsp Cream of Tartar (I omit)

Method
  1. In a bowl, using hand whisk, whisk yolks and sugar till sugar dissolves.
  2. Add salt, pandan juice, coconut milk and oil to the yolk mixture.  Mix well.
  3. Fold in sifted flour and baking powder. Mix until smooth and set aside.
  4. In another bowl, using an electric mixer, beat till the whites are frothy. Add in Cream of Tartar and beat till soft peaks.
  5. Add in sugar gradually and beat till stiff peaks.
  6. Fold in 1/3 of the whites into the yolk mixture using a rubber spatula till incorporated
  7. Pour the mixture to the remaining egg whites and fold in gently till incorporated.
  8. Pour the batter into 8" round pan. Bang the pan on the table to get rid of bubbles.
  9. Bake at pre-heated oven of 170C for 10 - 15 mins.
  10. Turn down the temperature to 160C and bake for another 35 - 40 mins.
  11. Reduce temperature further to 150C and bake for another 10 - 15 mins to brown the surface.
  12. Remove from the oven and invert the pan to cool.  

Kaya Layer
Adapted from Blessed Homemaker

Ingredients
(A)
1000g water
280g sugar
80g butter

(B)
400g pandan juice
400g coconut milk
120g corn flour
1 packet/13g agar agar powder (plain)

Method
  1. Stir (A) together in a pot and boil over low flame.
  2. Mix (B) together and add into (1). Keep stirring until the mixture thickens and boils.
  3. Let the kaya cool slightly before icing the cake.
To assemble the cake upside down
  1. Pour 1/2 portion of kaya in first, then layer with cake.
  2. Pour in balance kaya and layer with cake.
  3. Using a small plastic bag, pipe in the kaya at the edge.
  4. Chill cake in fridge before serving.
To assemble the cake upright
  1. Place a layer of cake at base of cake pan (I use one with removable base).
  2. Pour in 1/2 portion of kaya and layer with 2nd layer of cake.
  3. Pour in balance kaya and leave to set.
  4. Chill cake in fridge before serving.