Showing posts with label Pastry. Show all posts

Thursday, October 22, 2015

How To Make A Super Flaky Pastry (for puffs and pies)

 
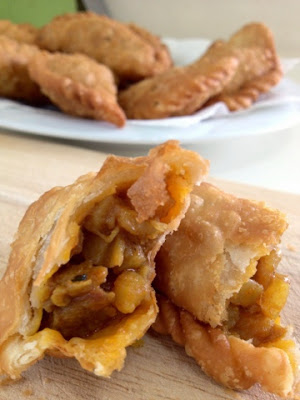
I used this pastry to make curry puffs and chicken pot pie.  This is one hell of a super flaky pastry.  Looking at the flakes will just leave you all excited and go bananas for a while.  Frankly, as a newbie to baking and not a trained cook/baker, I am not sure whether this is a puff pastry or not.  Whatever it is,..........I know that this IS a PASTRY,......... that makes a commendably great recipe. 

Before you scroll down any further, I wish to caution you that the explanation in this post is rather lengthy involving lots of steps.  I can't seem to find ways to simplify it any further.  If this is your first time making a puff pastry or something similar, be sure that you read everything very carefully.  I do recommend that you read the steps a few times to get the whole process digested and visualized before getting your hands dirty. 

I have also used color codes on the words to ease readability and understanding:
  1. Red indicates you need to let the dough rest for 20 minutes. By knowing this, it helps you plan your work more easily.
  2. Blue indicates the ingredients used. 

INDGREDIENTS:

600g plain flour
1 egg (beaten)
250ml warm water (not hot)
1 tsp salt
1 tsp yellow colouring (I used turmeric powder to get the yellow hue)
200g pastry margarine


STEPS:

Basically, making the pastry involves 3 steps : 
 
A) Making the dough
  • Combine warm water, salt and colouring in a bowl and mix until salt dissolves.
  • Combine flour, egg and water in another bowl and mix just until the mixture forms a dough. Do not overmix. Don't worry if  there are still specks of flour in the dough as they will 'disappear' after the rolling and folding process. 
  •  Cover dough with plastic and leave it to rest for at least 20 minutes.  

B) Preparing the pastry margarine
  • While the dough is resting, place the pastry margarine on a plastic.
  • Place another piece of plastic on the margarine. 
  • Roll out the margarine evenly into a rectangle. Leave aside.

C) Rolling and folding the dough
  1. Roll out the dough into a rectangle about 1cm thick, as evenly as possible. Then place the rolled-out pastry margarine on one side of the dough. (Pic 1)
  2. Fold dough into 2, just like you would close a book. (Pic 2)
  3. Press the edges to seal.  Cover dough with plastic & leave to rest for at least 20 minutes. (Pic 3)
  4. Turn dough at 90 deg. Then roll dough into a rectangle.
  5. Divide the rectangle vertically into thirds,  marking the dough lightly with the edge of your hand. Fold  the first third of the dough, overlapping the second third (Pic 4)
  6. Then fold over the last third of the dough overlapping both the 1st and 2nd thirds, brushing away the excess flour from the inside as you fold.  You should be getting a long vertical rectangle facing you. (Pic 5)
  7. Next, divide the dough into thirds again, this time from top to bottom.  Take the 1st third (right on top) and fold, overlapping the 2nd third.  (Pic 6)
  8. Now, take the last third and fold, overlapping the 1st and 2nd thirds to form a square. (Pic 7)  Cover dough with plastic and leave to rest for at least 20 minutes.
  9. Roll out the dough into a rectangle again. Repeat Step 5 & 6.
  10. Now, divide the dough into thirds again, from top to bottom. Then, cut the dough. (This step is just like step 7 except that this time the thirds are cut.) 
  11. Place the bottom third onto the middle third & followed by the top third. You'll end up with a tall squarish dough. (Pic 8) Cover dough with plastic & leave to rest for at least 20 minutes.
  12. Using a knife & a ruler, divide the dough into small squares and make markings on the dough. (I divided it into 16 squares.  Then carefully cut the small squares. (Pic 9)  At this stage, you can divide and cut into any sizes as you like, depending on what you are using it for.
  13. Refrigerate for a while and here you go..........the dough is ready for use!

    Saturday, July 26, 2014

    Banana Turnover


    I was at McDonald's (MCD) the other day (well, my usual hang-out area while waiting to pick up my son from school) enjoying their latest promotional craze - Banana Pie.  Well, I have to admit that I really fell for the pie the moment it set in my mouth.  The crust is just perfectly thin and super crisp.  The filling is slushy and yummy.

    It hit me so hard that I literally went bananas scouring the net searching high and low for a similar recipe of which I finally called it quit and waved the white flag.  Seriously, I can't seem to find any pie recipe close to that of McDonald's's version.  All I could find was the open-type but not the enclosed one.

    Persistent as I was, I  decided to make it from scratch.  First, I would have to search for the filling recipe, then followed by the pastry recipe.  Looking for the filling recipe was surprisingly easy.  I only found one recipe (that resembled McDonalds's version).  So, I hadn't had any choice to choose from - take it or leave it!  So cruel!  As for the pastry recipe, well I have to admit that I was more fussy and picky on this.  Actually, all that I am looking for in a pastry is that it has to be crispy and flaky.  I was somehow glad that I finally found one.

    Well, it took me two days before I got both the filling and pastry recipes that passed my so-called personal requirements.  Once done, I got down to business and made them.  All I could say, the making process was straightforward and pretty easy.

    But more importantly, what's my verdict on this recipe?  On a scale of 1-10, I would give an 8.  I am generally satisfied with what came out.  The filling was yummy with a nice buttery banana-ry aroma (except that it's a little on the sweet side).  The pastry was buttery, crisp and what's more important is it was SERIOUSLY FLAKY!!!  So, generally, FILLING + PASTRY = NICE BANANA TURNOVER.


     You may ask me - you gave 8 out of 10, so what happen to the remaining 2?  Well, so long as I don't find the McDonald's-like type, the pie does not deserve a 10 from me.

    The Recipe:
    A) Ingredients for the filling:
         (adapted from Taiwanese Cooking)
    • 4 ripe bananas, cut into 1/4-inch thick slices
    • 4 Tbsp. margarine or butter
    • 1/2 cups sugar
    • 1 Tbsp. lemon juice
    • 1 Tbsp. corn starch, dissolved in 2 Tbsp. water
    Instructions:
    1. Heat margarine or butter over medium heat in a wok or frying pan. Stir in sliced bananas and cook for about 2 minutes.
    2. Add sugar and lemon juice, then cook for another 3 to 4 minutes over low heat until the texture becomes slightly creamy. Add the corn starch, dissolved in water, to the mixture. Once the filling is creamy with chunks of banana, turn off the heat.  So, this is how it looks like finally.


    B) Ingredients for the pastry:
         (adapted from The Pink Whisk)

    • 300g plain flour
    • 225g butter, cold diced
    • (35g caster sugar for sweet pastry/1 tsp salt for savoury)
    • 6-8 tbsps cold water
    Instructions:

    1. Measure out the plain flour into a large bowl.
    2. Dice the cold butter into small pieces.  Easiest way I’ve found to do this is to work on a plate.  Slice the butter and add a good spoonful of the flour for the pastry.  Tossing the butter in the flour as you dice stops them from sticking to each other and keeps the pieces separate.
    3. Add the butter to the flour and start to rub it in with your fingertips.  Now maybe the reason I love flaky pastry so much is it’s the lazy persons pastry, you don’t want to rub it in fully pretend you’re making a shortcrust and do a half hearted job, only rubbing it in half way – so there’s plenty of little pebbles of butter still left.
    4. Stir through the caster sugar for a sweet Flaky pastry or 1 tsp of salt for savoury.
    5. Start to add the water, just a couple of tablespoons at a time and mix it together with the blade of table knife until it just comes together without being crumbly.
    6. Lightly knead the pastry in the bowl to form a dish.
    7. Wrap it in clingfilm or a freezer bag and place it in the fridge to chill for 1 hour.
     That’s it!  Flaky Pastry done!


    C) Assembling Everything
    1. Roll the dough (according to your desired size) into a square. 
    2. Put 2 to 3 heaping tablespoons of filling in the center of each square and fold in half into a rectangular shape. 
    3. Use a fork to press the edges firmly closed and to also make a decorative pattern.
    4. Arrange the turnovers 2 inches apart on a cooking sheet or in a baking pan lined with foil.
    5. Preheat the oven to 375 degrees F. Brush the turnovers with an egg wash, consisting half of water and half of eggs. Bake for 20 to 25 minutes until golden brown.

     HAPPY TRYING!!

    Wednesday, May 7, 2014

    Curry Puffs (Karipap)


    Curry puff is an Asian snack commonly found in Malaysia, Singapore and Thailand.  It is basically a deep-fried small pie made of pastry shell and stuffed with curried potato cubes and diced chicken meat.  I am proud to say that I grew up eating lots of them.  Needless to say, this is one of my all-time favourite childhood snacks.  Who doesn't love curry puffs, anyway?

    Until today, this savoury snack is not showing any sign of slowing down or being forgotten.  It is still widely found in any Malay warungs (a small modest family-owned restaurant) or even in any makeshift stalls along roadsides selling pisang goreng (banana fritters).  These two local snacks are really like brother and sister.  Where there is pisang goreng, there is karipap, for sure. 

    It is commonly eaten during breakfast or afternoon tea.  It goes really well with a cup of hot coffee/milk tea but I like it better with a glass of iced orange juice especially on a scorching afternoon. 


    This is my first attempt making karipap and I am absolutely pleased with the outcome.  I personally like this recipe a lot, thanks to Sonia of Nasi Lemak Lover, who has quite made a name in food blogging, where Asian food is concerned.  I invite you to see her recipe here.  I especially love the pastry.  To me, this is the exact texture I have been looking for.  It's  smooth, cripsy and most importantly flaky.  Just like making pineapple tart pastry, two rules of thumb you have to follow in order to produce a flaky pastry, they are:
    1. USE cold butter and work quickly before the butter melts, so try avoid using your bare hands when mixing the flour and butter as we do not want the heat from the hands to melt the butter.  So?  Use fork;
    2. DO NOT knead the dough, quickly bind it together with your hands.
    So, if you wish to give this recipe a try, here are the ingredients and method:


    Curry Puff (Karipap)
    makes about 15 big pcs 

    Pastry
    185g all-purpose flour
    35g rice flour
    35g corn flour or tapioca flour
    35g butter (salted)
    35g cooking oil or vegetable oil
    90g icy cold water

    Filling
    450g potato, peeled and diced
    1 medium onion, diced
    200g chicken breast (cut into small pieces, marinate with 1/2tbsp curry powder)
    1/2tbsp red chili powder 
    1tbsp curry powder (chicken flavour)
    3tbsp vegetable oil
    3 sprigs curry leaves
    1 cup water (+/-)
    1tsp salt
    1tsp chicken powder
    1tsp fish sauce

    Method
    To cook filling
    1. Heat oil in wok, add in curry leaves and onion. Saute onion until translucent then add in potato.
    2. Cook until potato has changed colour on the edges then add chicken breast, stir fry for 1-2mins then add in curry powder and chilli powder. Add water and bring to boil.
    3. Add salt, sugar, chicken powder & fish sauce to taste, then turn the heat down and cook until potato is soften and the liquid has reduced and form a dry paste. Cool completely before use. 

    Pastry
    1. In a large mixing bowl, bring 3 types of flours together and mix well. Set aside.
    2. Rub in butter with flours until crumble, then add in cooking oil, to mix well.
    3. Pour icy cold water over flours, mix thoroughly with a wooden spatula in the mixing bowl. Then, lightly knead till soft dough, do not over work. Cover dough with plastic wrap and rest for at least 15 minutes. 

    To assemble- Divide and shape dough into 13g each ball. Then roll out each ball into a 8-10cm circle, wrap in potato filling. Pinch edges to seal, then deep-fry in medium hot oil until golden brown.


    Saturday, August 24, 2013

    Melt-in-the-mouth Pineapple Tarts - Enclosed Version


    Barely two months after I last blog about pineapple tarts, here I come again, with another version of this glorious sweetie!  This time round, it is the enclosed type.

    Having grown  up eating loads and loads of homemade traditional Nyonya pineapple tarts which characteristically has its filling exposed, this bull-headed soul was just too dogged to recognize any other variations of the tart.  He was just too arrogant to even try them and to him, as though the open type was the ONLY one existed in this whole wide world. 

    Thus, it comes to no surprise if I say this is my first time eating this version of pineapple tarts, apart from the Taiwanese Pineapple Cake which coincidentally also has its filling enclosed.

    Taiwan Pineapple Cake
    Malaysia Pineapple Balls
    Thanks to Sonia of Nasi Lemak Lover, whose excellent and insightful posting on the enclosed version of the tart finally tamed down my arrogance and brought me a step closer into the realm of pineapple world.

    What drew me into reading her posting and experimenting the tarts myself were basically because of these two factors:

      a) it is super-duper straightforward which only calls for four ingredients, yes ONLY 4, and they 
          are bu---, con----, f----- and e---.

      b) it is the best melt-in-the-mouth pineapple tart version though you may have your melt-in-
          the-mouth recipe

    Huh?? Sure or not, Sonia??  Well, after taking my first bite, I would have to take my hat off.  You are absolutely correct!  The tarts are freaking melty!  Unquestionably, it is by far the best that I have ever tasted, too!


    So, here it is, the secret reveals.....

    Ingredients:

    350g butter
    100g condensed milk or sweetened creamer
    510 plain flour
    2 egg yolks

    700g pineapple filling (homemade or store-bought).
    You may find the recipe in my previous post here if you intend to make your own.

    1 egg yolk + 1 tsp milk, for egg wash

    Method:
    1. Cream butter and condensed milk till light.
    2. Add in egg yolk one at a time, and beat until combine.
    3. Mix in flour to make a dough. Make sure it's not sticky.
    4. Refrigerate for about 30 minutes.
    5. Meanwhile, roll pineapple filling into balls
    6. Flatten a piece of dough and place a ball of the rolled pineapple 
        filling in the middle.  Bring the edges of the dough together and 
        press lightly to seal.  Gently roll the ball on the surface of your
        table top so that the surface of the ball is smooth and neat.
    7. Glaze the rolled balls with egg wash.
    8. Bake in the preheated oven at 165C (fan forced) for about
        20 mins or till golden brown.
    9. Cool completely before storing.


    Happy baking!

    Saturday, July 13, 2013

    Nyonya Pineapple Tarts, The Crispy Type

     
    I started making pineapple tarts about 2 years ago.  Seriously, pineapple tart making is utterly labour-intensive and time-consuming.  Nevertheless, it is indeed a labour of love.  For those who have attempted making this Nyonya staple, you should know what I mean!

    The work includes cutting the pineapples, removing all the eyes (gosh, I hate this the most), grating the fruits, slow-cooking it under low heat until it turns jammy (well, this itself takes about 1-2 hours), preparing the dough, assembling everything and finally baking the tarts.  I usually spend about 3-4 hours just on the assembling part and just to make a batch consisting of a mere 50 bite-sized pieces.

    Well, I have to say that the whole family: my wife, my kids, including my in-laws really have a weakness for pineapple tarts.  However, as a matter of fact, not only that the price of a box (of tarts) sold outside is escalating like nobody's business but getting one that is nice and authentic is indeed hard to come by nowadays.  Hence, I feel it is high time that I get my hands dirty and learn to make my own.  Well, before getting down to business, I did my homework ie doing lots of reading from the net including seeking advice from my septuagenarian aunt (I affectionately call her Tuah Ee) whom we, among the relatives recognize her as the sifu of pineapple tart.  So, this could be the reason why when I made my very first batch of tarts, I did not encounter much hiccups and the outcome was fairly good and far from being disastrous.  I have made pineapple tarts for umpteen times and am now still fine-tuning it.

    Basically, there are two types of pineapple tarts ie the hard crispy type and the soft melt-in-the mouth type, the latter being more preferable.  Actually, it all boils down to the pastry.  Personally, I prefer the hard crispy pastry.  I do not like it too hard though but most importantly, the pastry must be crissppy.  When you make a cross section to the tart, you can see layers forming the pastry.  This is what I mean......


    Well, it all depends on the butter and the duration of baking.  To get this result, you must use the rub-in method.  While rubbing the butter with flour, it is important that you do not allow chance for the butter to melt.  That is the reason you need to work using your finger tips (as this is the coolest part of the hand) and everything needs to be done fast.  Secondly, you must never knead the dough.  Next, to make the pastry crispier, you just need to bake the pastry a little longer (about 5-10 minutes longer).

    If you like the crispy type, nah....here you go :

    Recipe
    (this yields about 50 pcs depending on how thick is your pastry and the size of your pastry cutter)

    A) For the pineapple jam:
            - 500g grated or chopped pineapple flesh (I always chopped)
            - 125g caster sugar
            - 125g rock sugar
            - 5 cloves
            - 2 cinnamon sticks

            Method
            1. In a heavy based saucepan, place the grated pineapple and spices and stir
                to dry the pineapple before adding the sugar.
            2. Once the sugar is added, reduce heat to low and stir regularly for about
                1 hour or until pineapple jam is relative dry. (remember that when you
                bake the tarts, the jam will further dry out)
            3. Make sure you stir it frequently as the bottom will burn easily.  Once it's
                thick and jammy, take it off the heat, remove the spices and allow to cool
                completely.
            4. Refrigerate for at least 1 hour or overnight.  This makes it easier for us to
                shape it into balls later.


    B) For the pastry:
         - 500g plain flour
         - 300g unsalted butter (slightly softened)
         - 2 eggs
         - 1 tsp salt
         - 2 tbsp icing sugar
         - 1 egg yolk (for brushing over pastry to create golden hue)

          Method
          1. With your fingertips, rub together the flour and butter until it resembles
              bread crumbs.
          2. Add the egg and gently coax all the crumb until it binds together.
          3. Bring it together and shape it into a disc (remember, DO NOT knead)
          4. Wrap it in cling wrap and refrigerate for at least half an hour. 

    C) The Assembling Process:
            1. Pre-roll the pineapple jam into small balls.
            2. Roll out the pastry dough to desired thickness.  Cut out dough using cutter.
                Arrange neatly onto the baking tray.
            3. Once you have arranged the tart shells on your tray, pop them into the
                pre-heated oven.  Bake at 175 degree Celsius for aboiut 10 minutes or until
                the shells are about to turn brown.  Note that at this point, the tart shells will
                expand.
            4. Take out from the oven and glaze the rims with egg wash.
            5. Place the pre-rolled pineapple jam balls onto the centre of each tart shell.
            6. Make a criss-cross pattern on the jam.  Then, glaze the patterns.
            7. Pop into the oven for the 2nd time.  Bake for another 10 minutes or until
                the tarts turn golden brown.


    HAPPY TRYING!!