Friday, July 4, 2014

Chocolate Molten Lava Cake

Frankly, I have never eaten this cake before let alone baking one myself.  Of course, people around me have been lamenting how much they adore this cake and some even got hysterical and rhapsodic by just hearing its name, especially the words MOLTEN...LAVA!!

Certainly, I do concur that the name itself is already enticing enough to itch your taste buds and eventually making your mouth salivate and your heart yearn to try one.  That's what exactly happened to me.  I have been longing to try eating and baking one myself.

So, last weekend, I managed to squeeze some time out to do some readings trying to look out for a decent recipe.  Hey! The recipe is somehow pretty straightforward and not at all complicated.  The ingredients used are very basic and easily available.  The procedure is just a child's play as claimed by others.  Another shocking fact I found out from some of those who have made one - the bake was.........SHOCKINGLY EASY!!!  Any Tom Dick and Harry can whip one!

As easy as it has been said, this dunghead somehow failed on his first attempt.   Only on his second attempt then he realized that he was not cut out for this cake.  His third try was just as disastrous as the other two.  However, persistency wins at last.  Exactly, I finally succeeded on my fourth try!  The first three came out cakey and hard in that there was NO molten lava whatsoever sloshing out upon cutting.  Reason?  Easy,......I have overbaked it.  Even extra one minute counts and matters.  So, my advice for those of you who intend to bake one yourself, please make one piece first and see the outcome, only then you bake the remaining pieces.


So, what's my final verdict on the successful piece?  Frankly, I enjoyed better eating the failed cake which is hard and cakey.  So as my son, he loved the first three batches much more than the last successful one.  Though no lava, the cake just goes perfectly well with a dollop of vanilla ice-cream.  I somehow feel a tinge of guilt and uneasiness eating the seemingly 'uncooked' chocolate liquid that oozes out.  Anyway, that is just my personal intuition.  You may not agree with me.  I may be the odd ones! He he...

So, for those of you who want to try making one yourself, here you go babe, the recipe adapted from Foodie By Nature.


INGREDIENTS
(yields about 5-6 pcs)
  • 4.5 ounces of dark chocolate, finely chopped
  • 110 grams of butter
  • 3 large eggs
  • 3/4 cup castor sugar-approximate 150 gms (I reduced to 100g)
  • 1/4 cup all purpose flour(35 grams)
  • Vanilla extract 1 teaspoon
  • 5-6 moulds or ramekins depending on size
  • Chocolate powder

METHOD


  1. Preheat oven at 200 degrees C for half an hour
  2. Butter moulds and dust with chocolate powder so it sticks to the butter..tap away excess
  3. Put chocolate and butter in a double boiler whisking every now and then until melted. Add vanilla extract
  4. In a bowl whisk together eggs,sugar and gradually flour until well blended. Slowly add melted and cooled chocolate-butter mixture
  5. Pour mixture into moulds / ramekins and put in oven ( up and down grill on)
  6. Place in center of oven and bake for approximate 12 mins or until sides leave moulds and top is cracked but wobbly.  The time will vary from oven to oven..start checking after 10 mins (Mine baked at 9 mins)
  7. Remove and serve at once.have straight from the mould until u try it a couple of times..then you can start turning it upside down once you are more confident. Serve with vanilla ice- cream..

Friday, June 27, 2014

Chocolate Banana Cake


This simple cake really wowed me to the max.  It was indeed a real SURPRISE to see a bake that is soo soft and fluffy.  

Anyway, the moment the cake landed on my hands when I was unmoulding it, I already knew that it would be one hell of a good cake.  True enough, this babe is just gorgeously soft, light, moist and luscious.  Whatever it is, you just have got to try baking one to believe it.

After my successful and satisfying attempt trying her Chocolate Caramel Banana Upside-down Cake), I must give my credit, again to Joyce of Kitchen Flavours for sharing this amazing secret.  I am linking back her post and recipe here for your further read-up.   

Seriously, if you are free and want to find something to bake, do give this recipe a shot. Till then, have a great day ahead. 

Chocolate Banana Quick Cake
Makes one 9x5-inch loaf cake, serving 8

1-1/4 cups (5.3oz/151gm) all-purpose flour
1/4 cup (0.8oz/23gm) Dutch-processed cocoa powder
1 teaspoon baking soda
1/4 teaspoon salt
1/2 cup (1 stick/4oz/113gm) unsalted butter, softened
1 cup (7oz/200gm) granulated sugar
2 large eggs
1-1/3 cups (320ml) mashed ripe bananas (about 3 medium bananas)
1 teaspoon vanilla extract
1/2 cup (4.2oz/121gm) sour cream (I use yoghurt)
4 ounces (113gm) bittersweet chocolate, finely chopped (I use chocolate chips)


Method:

  1. Position a rack in the center of the oven and preheat the oven to 350F. Grease the bottom and sides of a 9x5-inch loaf pan.
  2. Sift together the flour, cocoa powder, baking soda, and salt into a medium bowl. Whisk to combine, and set aside.
  3. In the bowl of an electric mixer, using the paddle attachment, beat the butter at medium speed until creamy, about 1 minute. Gradually beat in the sugar and beat at high speed until well blended, about 2 minutes. At medium speed, beat in the eggs one at a time, beating well after each addition and scraping down the sides of the bowl as necessary. Add the mashed bananas and vanilla extract and mix at low speed until blended. Add the flour mixture at low speed in three additions, alternating it with the sour cream in two additions. Remove the bowl from the mixer stand and stir in the chopped chocolate. Scrape the batter into the prepared pan and smooth the top with a spatula.
  4. Bake the cake for 55 to 65 minutes, until a cake tester inserted into the center comes out clean (except for any melted chocolate). Cool the cake in the pan on a wire rack for 15 minutes.
  5. Unmold the cake onto the rack, turn right side up, and cool completely.
Store at room temperature, covered in foil, for up to 5 days.

Wednesday, June 18, 2014

Chocolate Caramel Banana Upside-down Cake

This recipe is definitely a keeper.   If you love caramel, banana and chocolate just exactly like I do, then this cake is seriously for you.  Bring this to any potluck gathering and I am positively sure this secret indulgence will be a crowd pleaser.

To me, chocolate especially dark rich chocolate just goes perfectly well with any ripe bananas.  These two ingredients really make good cakes as the flavour and aroma are just crazy.  More so, when the cake is drizzled with a slosh of caramel, oh my goodness gracious, the whole thing is just devilishly sublime.

Anyway, this recipe came to me by chance.  I was scouring around the net for a bak chang (Chinese dumpling) recipe when I accidentally spotted this secret.  I must thank Joyce of Kitchen Flavours for sharing this wonderful treat.  I strongly encourage that you visit her post here to view some close-up photos.  Indeed, looking at the photos was sufficient enough to make me go bananas.  I had to divert my ravenous eyes away (eerr from my bak chang recipe searching) and subsequently clicked in and explored the secret further.


I am pleased that I baked this cake as it helps to add on to my favourite and to-die-for collection of cake recipes.  The cake is chocolaty rich, moist and more importantly not overly sweet despite the caramel drizzle.  Wife likes it a lot and daughter loves it dearly too! But to me, it would have been even more perfect if I had added in some mashed bananas and chocolate chips into the cake batter, making the cake look even moister and taste more flavorsome.  Eerm, definitely going to try this the next round.

That's it, here you go, the recipe...  

Chocolate Caramel Banana Upside-Down Cake
(adapted from Joyce of "Kitchen Flavours")
Serves 8
For The Topping :
1/2 cup (1 stick) unsalted butter
3/4 cup packed light brown sugar
3 ripe bananas, peeled and cut into 1/4-inch thick slices


For The Cake :
3/4 cup plus 2 tablespoons unbleached all-purpose flour
6 tablespoons cocoa powder, sifted
3/4 teaspoon baking soda
1/4 teaspoon salt
6 tablespoons (3/4 stick) unsalted butter, softened
1 cup granulated sugar
2 large eggs
2 teaspoons pure vanilla extract
2/3 cup buttermilk (alternatively, you could also substitute it with 4-5 tablespoons milk and top up with homemade yoghurt to get 2/3 cup, as what Joyce had used)


Making the topping :
  1. Preheat the oven to 350F. Grease a 9-inch round non-stick pan.
  2. Heat the butter in a medium saucepan over a medium heat until foamy. Whisk in the brown sugar, turn the heat to low, and cook, whisking, for 2 minutes. Scrape the mixture into the prepared pan and smooth with a spatula. Arrange the banana slices in concentric circles on top of the sugar mixture. Set aside.

Making The Cake :
  1. Combine the flour, cocoa powder, baking soda, and salt in a medium mixing bowl.
  2. Combine the butter and granulated sugar in a large mixing bowl and cream with an electric mixer on medium-high speed until fluffy, about 3 minutes.
  3. With the mixer on low speed, add the eggs, one at a time, scraping down the sides after each. Turn the mixer to high speed and beat until the mixture is light and increased in volume, about 2 minutes. Stir in the vanilla.
  4. With the mixer on low, stir in 1/3 of the flour mixture. Stir in 1/2 of the buttermilk. Repeat with the remaining flour and milk, ending with the flour. Scrape down the sides of the bowl and beat the batter on high speed for 30 seconds.
  5. Pour the batter over the bananas, gently spreading it into an even layer.
  6. Bake until a toothpick inserted into the center comes out clean, 40 to 45 minutes. Transfer the pan to a wire rack and let stand for 5 minutes. Holding the pan and a plate together with oven mitts, immediately invert the hot cake onto the plate. If necessary, replace any fruit stuck to the bottom of the pan. Let the cake cool for 20 minutes and serve warm, or serve at room temperature. Store uneaten cake in a cake keeper, or wrap in plastic and store at room temperature for up to 2 days.

Friday, June 6, 2014

Bak Chang

After my self-claimed success making nyonya chang the other day, so here I come again trying my hand now at bak chang, literally means meat dumpling.  Personally, I have always preferred bak chang to nyonya chang.  Reasons?  Well, bak chang tastes much saltier, meatier and there's also a variety of ingredients in it to go with the sticky glutinous rice, but the top most important reason is the chunk of pork belly meat with its wobbly-looking fat still remained intact in the bak chang that is ready for us to savour.  As what people used to say, 'save the best for the last'.  This is exactly what I do every time I eat a bak chang, the fatty part will without fail be my last bite.  So, I always end my bak chang eating on a high note.  Truthfully, a bite of that fat is just 'divine'.


Talking about my bak chang making experience, well I have underestimated the whole process.  I had thought that everything would be smooth-sailing and fast and simple.  I had prepared all the ingredients and soaked them in the morning.  I had planned to fry them after my class at 9.30pm.  After all, it was just stir frying and would definitely not eat that much time.  Only then I would wrap the dumplings and keep them refrigerated before boiling them the next morning.  That was what I had planned.  BUT everything went haywire.  Stir frying all the ingredients took me about 1 hour.  Preparing the soaked leaves and setting up my work station took me another 45mins to 1 hour.  So, you can now work down to guess what time I actually started wrapping and tying the dumpling, huh!  When I was tying the dumpling, I did not know what went wrong, somehow I lost my grace and nothing seemed to work.  The whole process was slowed down.  Well, guess what time I finished everything and went to bed?  3.30........A.M.!  This is CRAZY!

However, luckily the end result was NOT CRAZY!  Ha ha!  I am pleasantly satisfied with this recipe in which everything turns out to be positively encouraging.  Mom was surprisingly pleased with the taste claiming that my bak chang tasted even better than the ones she bought from her friend.  Two constructive comments were the chestnuts were not properly cooked as in they were not soft enough (in fact I should have boiled them after soaking) and another one was the wrapping and tying eeeerr....still needs a little brushing up.  A hollering YES, I certainly do concur with her that I need lots of practice especially on the tying part considering that just imagine 10 out of 20 pieces of the dumplings that I made slipped from the strings and eventually got unwrapped during the boiling process.  I was left speechless and completely frustrated upon looking at the rice grains including all the ingredients nicely floating in the boiling water. $@$#$%!

So, that's it....my first bold attempts making two kinds of dumplings - nyonya chang and bak chang!  To put it simply - an extremely tedious work but a time well spent and an effort worth invested.


Oh, yah, before I forget, I must thank Su-yin of Bread et Butter for sharing out the recipe, of which you can find it here.  It was her nai-nai's (grandmother's) recipe.  In fact, I just stumbled upon her blog when I was browsing through the net looking for a bak chang recipe.  I got hooked to this recipe simply because it was her nai-nai'sHe he!  To me, you can never go wrong with any recipes so long as it is from a grandmother's!  Anyway, my hats off to her for taking the trouble to learn how to make this dying traditional Chinese food.  As a twenty-something gal, she could have enjoyed life doing what modern young girls supposed to do like hanging out with friends, going for movies, fiddling around with electronic gadgets, going for dates etc etc.  Instead, she chose to be in the kitchen mingling with woks and pans just for one thing - preserving the tradition.  Wow!  Kudos to you, sweetie! 

So, here you go, Su-yin's nai-nai's bak chang recipe.......

Nai Nai’s bak chang
Makes approximately 19-20

Ingredients:
  • 500g pork belly, chopped into ~ 2cm chunks
  • 1 kg glutinous rice
  • 20 dried chestnuts
  • 1 chinese rice bowl of dried shrimps (heh bee)
  • 1 chinese rice bowl of dried Chinese mushrooms – I used approximately 40 tiny ones
  • 1 Chinese sausage (lap cheong)
  • 6 salted duck eggs (we will only be using the yolks)
  • 20 shallots
For the pork belly marinade:
  • 3 tbsp oyster sauce
  • 1 tbsp light soy sauce
  • 1 tbsp dark soy sauce
  • 1 tsp sesame oil
  • 1 tsp Shaoxing rice wine
  • 2 tbsp five spice powder
  • 1 tsp white pepper
For the rice marinade: (approximate amounts – you may need to adjust according to taste)
  • 5 tbsp oyster sauce
  • 5 tbsp dark soya sauce
  • 1 tbsp light soya sauce
  • 1 tbsp sesame oil
  • 1 tbsp white pepper
For wrapping:
  • at least 60 bamboo leaves (you need 2 per bak chang, with some spares in case of tears/holes in leaves)
  • cooking string/hemp leaves
Method:
The night before :
  1. Soak the bamboo leaves in a large pot of cold water (I used my 28cm Le Creuset pot). Try to submerge as much of the leaves in the water as you possibly can.
  2. Soak the glutinous rice in cold water.
  3. Soak the chestnuts in cold water.
  4. Mix all the ingredients for the pork marinade together. Pour it over the pork belly pieces, and leave to marinade overnight in the fridge.
Preparing the ingredients:
  1. Cook the duck eggs in a pot of boiling water, for 10 minutes. Leave to cool sightly, peel, separating the yolk from the whites. We will only be using the yolks, so store the whites in the fridge for another use – I use them for steamed eggs, and as a condiment for porridge. Cut the yolks into quarters.
  2. Soak dried shrimps in a bowl, using hot water.
  3. Soak the Chinese mushrooms in a bowl, using hot water. If your mushrooms are very large you may want to slice them in half.
  4. Slice the Chinese sausage into 1 cm slices.
  5. Peel and finely dice the shallots. I cheat and use my mini food processor, which does the dicing in 5 seconds flat.
Cooking the ingredients:
  1. Heat 1 tbsp corn oil in a large pan/wok. Using high heat, fry the Chinese sausage until they brown slightly and become fragrant, about 2 minutes. Remove from pan, and place in a bowl.
  2. In the same pan, fry the dried shrimps until they become fragrant, about 2-3 minutes. Remove from pan, and place in a bowl.
  3. In the same pan, fry the Chinese mushrooms until they become fragrant, and brown slightly. I usually season with a pinch of salt (old habits die hard). Remove from pan, and place in a bowl.
  4. In the same pan, fry the pre-soaked chestnuts until they brown slightly. Remove from pan, and place in a bowl.
  5. In the same pan, fry the pork belly chunks until they turn lightly browned. We’re not aiming to fully cook the pork belly here – the aim is to sear it briefly. Remove from pan, and place in a bowl.
  6. Add 1 tbsp corn oil to the same pan. Fry the shallots until they become fragrant. Add the glutinous rice flour, and stir for 1 minute. Add all the ingredients for the rice marinade, and any leftover pork marinade you have. Taste, and add extra oyster sauce/dark soya sauce etc as necessary. Switch off the flame, and leave rice in the pan. You can always transfer the rice to a bowl, but why wash an extra bowl?
Wrapping the bak chang:
  1. Drain the water from the bamboo leaves. Pat the leaves dry with a cloth – it doesn’t matter if they are still slightly wet.
  2. Select two leaves, and place them in opposite directions (i.e. the tail end of one lining up with the top end of the other). Do not use any leaves which already have holes in them, as they will cause water to seep into the bak chang during the cooking process.
  3. Form leaves into a cone.
  4. Fill the cone about 1/3 of the way with the glutinous rice.
  5. Then, place each of the following atop the rice: one chunk of pork belly, one chestnut, one/two Chinese mushrooms (use two if mushrooms are small), two slices of Chinese sausage, 1/2 tsp dried shrimps, and a piece of duck egg yolk.
  6. Top with more glutinous rice, till you reach the brim of the cone.
  7. Fold the leaves around the pouch, and secure with cooking string/hemp leaves.
  8. Repeat with remaining leaves and ingredients, until everything is used up.
Cooking the bak chang:
  1. Boil water in a large pot. When the water comes to a boil, gently lower the bak chang’s into the water. Make sure the entire bak chang is submerged in water. Cover the pot with a lid, and cook over medium heat for 2-3 hours. You may find that you need two pots if yours isn’t large enough.. I had to use two!
  2. To test if they are cooked through – you’ll have to unwrap one and check. And taste. (The perks of cooking.)
  3. Once the bak changs are cooked, remove from the pan and place in a colander – I use a colander as it allows any extra water to drain away. Alternatively you can hang them up, but I didn’t want water to drip all over my stove!
 Happy Dumpling Festival!

Tuesday, May 27, 2014

Nyonya Chang


Here it is my very first bold attempt making this traditional Chinese classic or zongzi in Mandarin, chang in Hokkien and dumpling in English.  Frankly, I can't really believe that I have come this far making changs.  What satisfies me the most is I went about doing everything on my own without the accompaniment of any experienced elder.  I was all alone throughout the whole making process from buying the ingredients, cutting the meat, making the filling, tying the dumplings to boiling them.  To tell you the truth, I've never bought pork from a butcher before and obviously communicating with the not-so-friendly rough-spoken Chinese butcher in Mandarin is quite a daunting task for me.  I didn't even know what is pork belly called in Mandarin but luckily Google Translate saved the day. 

Of course, I find wrapping and tying the dumplings the most challenging task.  It all happened on a dark stormy night when rain was beating like bullets, lightnings were flashing rather frighteningly and thunders were booming angrily, I was all alone sitting in my living room wrapping and tying my dumplings.  Hey, I'm not making up the whole scene okay but coincidentally this was what exactly happened that night.

After my wife and kids slept, I went downstairs, quickly set up my work station and began wrapping my dumplings accompanied by nobody except for a few virtual elderly aunties who appeared on my laptop screen showing me the way to wrap and tie the dumplings.  While wrapping I was looking at the demonstration video clips via YouTube.  Very true, it's easier seen than done!  Immediately, I felt like giving up.  The first dumpling I tied crashed down on the floor scattering all the grains and fillings.  At that spur of the moment, my heart crushed and a surge of loneliness sipped in.  While I was cleaning up the mess, suddenly I thought of my mom.  How I wished she was beside me showing and guiding me how to tie dumplings.  However, I went on to pick the bits and pieces of the grains including my crushed heart.  Staying strong, I continued and and eventually pulled it through.  I am now on my third batch of my dumpling making project. Yipee!


Okay, now back to my nyonya dumpling.  I chose this recipe simply for the reason that it was Amy Beh's, a well-known celebrity chef and newspaper columnist in Malaysia.  With her accolades, I  thought how wrong could I go with her recipe?  Browsing through the ingredients and after having a word with my tua ee (eldest auntie), YES I was on the right track.  Based on my tua ee's input, I made slight modification to the recipe.  I made it sligthly more flavourful after I was told that the taste would be blander during the boiling process. 

Overall, I am absolutely glad that everything particularly the taste turned out well.  I benchmarked it with my tua ee's dumplings and what I got was to me that of what I have been eating all these years.  However, one setback, mine was not as nice-looking as that of my aunt's.  Hers was clean-looking with a striking blue hue on top whereas mine was rather murky and not that appetizing.  So, this leaves me with lots of rooms to improve.


Recipe - Nyonya Chang
Source : Kuali.com (Amy Beh)
Yields approximately 15 big dumplings

Ingredients

  • 700g glutinous rice 
  • Some screwpine leaves, cut into 4 cm lengths
  • Dried bamboo leaves, washed and boiled until soften 
  • Hemp strings for tying
  • 2 tbsp salt
  • 1 tbsp sugar
Filling
  • 5 shallots, minced (I used 7 shallots)
  • 2 tbsp chopped garlic
  • ½ cup oil 
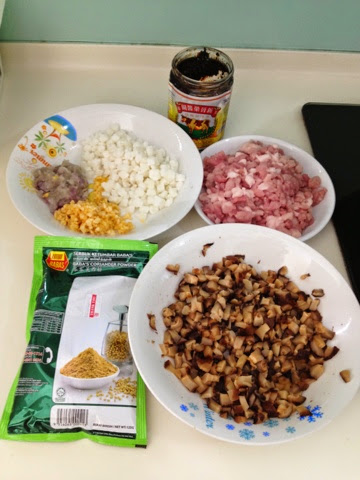
  • 3 tsp preserved soya bean paste (tau cheong)
  • 7 tbsp coriander powder (ground ketumbar), mixed with 170ml water into a paste (increased to 8 tbsp)
  • 450g belly pork, skin removed and cut into very small cubes
  • 12-14 dried mushrooms, soaked and diced
  • 100g candied winter melon, diced (increased to 150g)
Seasoning (combined)
  • 3 tsp pepper
  • 5½-6 tbsp sugar or to taste (replaced with brown sugar, 6-7 tbsp)
  • 1 tbsp thick soy sauce (2 tbsp)
  • 1 tbsp light soy sauce (2 tbsp)
  • 2½-3 tsp salt or to taste
  • ½ tsp ground black pepper

Method

To prepare rice (I apportioned the rice to tinged some blue with the blue pea flower)
  1. Boil some water together with 30 blue pea flowers to get blue tinged water.
  2. Soak 200g of the rice with this water for at least 3 hours.
  3. Soak the rest of the rice with water at the same time.
To prepare the filling
  1. Heat oil in a non-stick pan, fry shallots and garlic until aromatic. Add soya bean paste and coriander paste. Fry until fragrant.
  2. Add pork, winter melon and mushrooms, and mix in combined seasoning. Fry until pork is heated through. Dish out and set aside.
To assemble the dumplings
  1. Drain the glutinous rice and briefly rinse the rice.
  2. Overlap 2 bamboo leaves lengthways then fold into a cone. 
  3. Fill in this order into the cone-2 tbsp blue glutinous rice, 2 tbsp filling, 2-3 tbsp white glutinous rice.
  4. Cover with a piece of screwpine leaf. Press down to compress the dumpling. Wrap into a pyramid shape. Tie tightly with hemp string to secure. Repeat until all the ingredients are used up.
  5. Bring a large pot of water to a boil. Add salt and sugar then put in the dumplings and immerse them completely. Cook in rapidly boiling water for 2-2½ hours. Remove the dumplings and hang them to drain off excess water.

Thursday, May 15, 2014

Fried Oyster Omelette


Fried Oyster Omelette is another famous street food in Asia.  It is said that this is a must-try hawker food when one visits Asia and this is the reason why this food has been constantly ranked as one of the most sought-after hawker food in Taiwan.  This Chinese dish is widely found in many parts of Asia including Malaysia, Singapore, Thailand and the Philippines.  Easily found in night markets, this is one heck of a dish to die for.  It is savoury, creamy, zesty, chewy, some gooey and some crispy! 

In Malaysia, it is commonly called Oh Chien, literally means fried (chien) osyter (Oh) in the Hokkien dialect.  This dish is easily available in any foodcourts in Penang and Malacca (where I'm currently residing). 

Needless to say, I really have weakness for this food where I got infatuated with it when I was seven, if I may recall.  I could still remember how my mom and my uncle used to occasionally bring back this food nicely wrapped in a sheet of plastic and newspaper.   Though closely wrapped, the aroma would somehow make its way out wafting the air and I would be like YES!  Mom knew very well that I loved it so much that she boldly tried frying one plate for me.  The result was quite shockingly disastrous where all I got was a big lump of starch clumped together.  I did not want to disappoint her, so I tried to pretend that it was okay and edible.  Somehow or other, my innocent expression failed to cheat and convince her!

Whatever it is, this dish is truly a comfort food for me until today.  The combination of omelette, starch, fresh oysters and sprigs of fresh coriander leaves with a zest of squeezed lime juice just blend so beautifully making the dish deliciously sublime and leaving you totally perked up.

Surprisingly, this dish is so easy to prepare.  Not many ingredients involved.  They are quite easily available except for the oysters where you may have to buy them fresh from the morning market and at times it could be hard to come by.   Preparation only takes less than 10 minutes and frying only eats a miniscule 5 minutes.  So, barely 20 minutes, a plate of vibrant looking and savoury Oh Chien is already sitting nicely on the table ready to fire your palate and appease your appetite.

I got the recipe from Kenneth Goh of Guai Shu Shu in which he gave a very well write up on the dish.  Of course, there are aplenty of them on the net but Ken's photos somehow caught my hungry eyes.  The photo shots were spot on.  The colours looked deliciously vibrant making the dish looked irresistibly tempting.  Everything was perfect, just the exact type of fried oyster I used to eat when I was just an innocent young boy.

So, for those of you who have not had this dish before, I highly recommend that you give it a try.  Certainly, you don't have to be physically here in Asia, just scroll down and you will have this delectable Asian treat right before you, in your humble kitchen.    

The Ingredients:
(makes one big plate, as per picture)
  • A handful of fresh oysters or defrosted frozen oysters
  • Some spring onion (chopped separately for the white portion and green portion)
  • 2 cloves of garlic 
  • 2 tablespoons of tapioca starch or corn starch  or sweet potato starch
  • 1 tablespoon of rice flour
  • 2 tablespoons of fish sauce
  • 1/2 teaspoon of white pepper
  • 2 tablespoons of cooking oil
  • 10 tablespoons of water
  • 4 eggs, lightly beaten
  • Some sprigs of coriander leaves for garnish

The Steps:
  1. Defrost the frozen oysters completely, wash carefully in cold water and drain well.
  2. Mix the tapioca/corn/potato starch and rice flour together with the water to make a watery starchy solution.  Set aside for later use. 
  3. Heat the frying pan with 2 tablespoons of oil.  Stir fry the white portion of the spring onion and garlic until fragrant.  
  4. Pour in the starch solution until the batter is half cooked (about 15 seconds)
  5. Add in the beaten eggs and when the eggs are almost cooked, add in seasonings (fish sauce and white pepper).  Stir until well mixed. 
  6. Add in the fresh oyster and stir fry for another one minute. 
  7. Off the heat and garnish with coriander leaves or spring onions (the green portion)
Note: Best served hot as a snack with homemade garlic chilli sauce and squeezed lime juice.

 Bon Appetite!

Wednesday, May 7, 2014

Curry Puffs (Karipap)


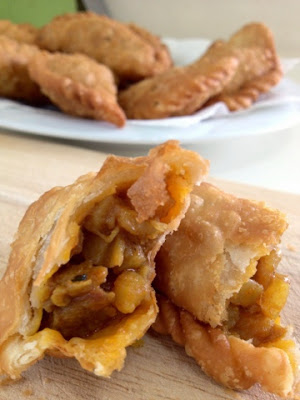
Curry puff is an Asian snack commonly found in Malaysia, Singapore and Thailand.  It is basically a deep-fried small pie made of pastry shell and stuffed with curried potato cubes and diced chicken meat.  I am proud to say that I grew up eating lots of them.  Needless to say, this is one of my all-time favourite childhood snacks.  Who doesn't love curry puffs, anyway?

Until today, this savoury snack is not showing any sign of slowing down or being forgotten.  It is still widely found in any Malay warungs (a small modest family-owned restaurant) or even in any makeshift stalls along roadsides selling pisang goreng (banana fritters).  These two local snacks are really like brother and sister.  Where there is pisang goreng, there is karipap, for sure. 

It is commonly eaten during breakfast or afternoon tea.  It goes really well with a cup of hot coffee/milk tea but I like it better with a glass of iced orange juice especially on a scorching afternoon. 


This is my first attempt making karipap and I am absolutely pleased with the outcome.  I personally like this recipe a lot, thanks to Sonia of Nasi Lemak Lover, who has quite made a name in food blogging, where Asian food is concerned.  I invite you to see her recipe here.  I especially love the pastry.  To me, this is the exact texture I have been looking for.  It's  smooth, cripsy and most importantly flaky.  Just like making pineapple tart pastry, two rules of thumb you have to follow in order to produce a flaky pastry, they are:
  1. USE cold butter and work quickly before the butter melts, so try avoid using your bare hands when mixing the flour and butter as we do not want the heat from the hands to melt the butter.  So?  Use fork;
  2. DO NOT knead the dough, quickly bind it together with your hands.
So, if you wish to give this recipe a try, here are the ingredients and method:


Curry Puff (Karipap)
makes about 15 big pcs 

Pastry
185g all-purpose flour
35g rice flour
35g corn flour or tapioca flour
35g butter (salted)
35g cooking oil or vegetable oil
90g icy cold water

Filling
450g potato, peeled and diced
1 medium onion, diced
200g chicken breast (cut into small pieces, marinate with 1/2tbsp curry powder)
1/2tbsp red chili powder 
1tbsp curry powder (chicken flavour)
3tbsp vegetable oil
3 sprigs curry leaves
1 cup water (+/-)
1tsp salt
1tsp chicken powder
1tsp fish sauce

Method
To cook filling
1. Heat oil in wok, add in curry leaves and onion. Saute onion until translucent then add in potato.
2. Cook until potato has changed colour on the edges then add chicken breast, stir fry for 1-2mins then add in curry powder and chilli powder. Add water and bring to boil.
3. Add salt, sugar, chicken powder & fish sauce to taste, then turn the heat down and cook until potato is soften and the liquid has reduced and form a dry paste. Cool completely before use. 

Pastry
1. In a large mixing bowl, bring 3 types of flours together and mix well. Set aside.
2. Rub in butter with flours until crumble, then add in cooking oil, to mix well.
3. Pour icy cold water over flours, mix thoroughly with a wooden spatula in the mixing bowl. Then, lightly knead till soft dough, do not over work. Cover dough with plastic wrap and rest for at least 15 minutes. 

To assemble- Divide and shape dough into 13g each ball. Then roll out each ball into a 8-10cm circle, wrap in potato filling. Pinch edges to seal, then deep-fry in medium hot oil until golden brown.