Tuesday, September 17, 2013

KL Chilli Pan Mee


Our palate can sometimes be unreasonably picky and weird.  For the past three weeks (just imagine, 3 WEEKS!) I have had a dire crave for Chilli Pan Mee.  It just happens for NO REASON!  Weird!  Almost twice a week I would have to please my palate with pan mee.  Well, yesterday I finally drew the curtain on.  I walloped two bowls of pan mee in a day - one at lunch and one at dinner.  That somehow cloyed my appetite and it was the last straw - it's time I call it quit!  No more pan mee for 1 month...or 2 weeks...or perhaps 5 days?? Well.......you see!  Weird!

I first had my chilli pan mee about three years back in this restaurant here, called Restoran Super Kitchen Chilli Pan Mee in Taipan, USJ, thanks to my eldest sister, Iris for bringing me there.  I would say it wasn't a love-at-first-sight kind of encounter.  It took me quite a while, after about 2-3 visits to this restaurant before I acquired the taste and eventually lurved this KL-born treat.  It was entirely different for my son where the taste almost instantly hit him and bingo, loved it!  

In Malacca, pan mee is not really that popular, well I can say not popular AT ALL!  It's normally called mee hoon kueh or in my Baba-nyonya language, kueh cubit-cubit (sorry if I'm wrong but my family has been calling it by that name ever since).  The shape is different in that the noodle is torn apart (from the dough), flatten and stretched to the desired thickness with the fingers. That's the reason some call it hand-torn noodles.  As a matter of fact, KL pan mee is seriously gaining its following here in Malacca.  Stalls selling pan mee are mushrooming steadily in food courts.  Whatever it is, KL's pan mee still fares better in taste.  But one thing the both have in common and I believe many would agree with me - eating pan mee can really be addictive! 

Well, let's come back to my experience in making my own pan mee.  To put it simply, the experience was frighteningly laborious!  The next time, I would rather buy it outside!  I spent the whole morning making just three bowls.  Making the chilli paste took me about 1 hour.  Making the dough including letting it set in the fridge was another 45 mins.  Making the minced meat ingredient stole another 45 mins.  Making the soup and poaching the eggs took another 30 mins.  And the worst part was making the noodles (I manually handmade them, strand by strand), 1 more hour.  Luckily, assembling everything was just a miniscule 5 mins.  And luckily also, it was for my wife and children.  Had it for other people, I would have cursed and sworn! 

Generally, I am quite satisfied with what came out.  Although the work was painstakingly time-consuming, the satisfaction eating what you have laboured for hours made all the efforts paid off.  What excites me when eating pan mee is when I puncture the egg yolk and mix everything together.  Looking at how the runny egg yolk oozes out and blends with the other condiments and eventually makes up the sauce just fires the taste buds and salivates the mouth.  Aarhh, heavenly! 

Now, here's the recipe:

The Recipe:
(Serves 4)
(I adapted from Swee San from The Sweet Spot)

A) Dry Chilli Paste
      2 handful of Dried Chillies, soaked
      2 Fresh red chillies
      2 Fresh Chilli Padies (or more if you want even more
         kick) - I omitted this
      1 palm of Dried Shrimp
      5 Shallots or 2 Medium Onions
      4 tablespoons of Oil

      Blend the ingredients, you might need to add a little
      bit of oil to help the blender

      Then transfer into a pan on low heat, fry slowly until
      dry and golden brown. 

      Make sure you keep a close watch over it and stir it
      quite often so it doesn’t burn. This takes about
      30 mins. 

      Once completed, set aside to cool.


B) The Noodles
     500g bread flour
     480ml water
     Pinch of salt

     Mix flour, salt and water together in a mixer with 
     a dough attachment and knead for 5 minutes. 
     Cover in cling film and let it rest for 30 minutes.  
     I kneaded it manually by hand. 

     Cut into 4 portions. Roll out on pasta machine. 
     You can use the thin or thick setting, or cut by hand.

C) The Minced Pork
  • 300g of minced pork
  • 1 tbsp oyster sauce
  • 1 tsp light soya sauce
  • 1 tsp dark soya sauce
  • Dash of salt
  • Dash of pepper
  • 2 cloves garlic
  • 2 tbsp oil
  • ¼ cup water
  1. Marinate minced pork with all the sauce.
  2. On a pan, fry garlic in oil. Add in the minced pork and cook. Add salt and pepper.
  3. Add water or stock and let it cook till the sauce simmers down
D) The Soup
  • 1L water
  • 1 handful of anchovies
  • Salt & pepper
  • Manicai or baby spinach
  1. Boil water and anchovies in a pot. You can add in stock cubes if you want. Season.
  2. As for manicai (pucuk manis) or spinach, you can blanch it before serving.
E) Assembly
  • Poached Egg
  • Fried Anchovies
  • Coriander leaves
  1. Wash anchovies, dry it well, then fry it. This can be made in advance.
  2. Poach egg, scoop out and set aside.
  3. Cook noodles in the same pot of water till its springy and floats on top.
  4. So first, add noodles. Add 1 tbsp chili (or more), minced meat, fried anchovies, poached eggs and sprinkle some coriander leaves on top.


Happy trying!!

Wednesday, September 11, 2013

Orange Swiss Roll


I was sitting on the couch last night, all alone enjoying my dinner while watching my favourite channel, Asian Food Channel.  Immediately after that, I decided to have a piece of the cake I baked the day before for dessert.  Yes, pretty obvious it was a swiss roll.  The moment I opened the container, the sugary and citrusy scent of the orange flavour almost instantly wafted into the air making me all perked up.  I took a small bite and....'hey, it is not that bad after all!'

In fact, I was very disappointed with the outcome.  The bake did not turn out to be what I had expected.  Everything just seemed not right!  That night, I was doing some office work and at the same time I was baking.  Yes, very clever of me trying to kill two birds with one stone.  At the end of baking, I opened my oven door and was rather shocked to see my cake rose unusually high.  Panicked, I just increased the baking time to another 10 minutes.  Please do not ask me why I did so.  As soon as the cake was taken out, it just collapsed, so as my heart!  So, as expected, the cake was dry and flat.  Then, towards the end of the assembling process, the cream filling suddenly melted and was runny.  I thought of dumping the whole thing into the bin.  Finally, I chucked it into the refrigerator, angry and disappointed. 

The following morning, I was caught by surprise to see the cake, standing proudly and smiling at me and said 'Hi, I'm Miss Swiss, so how do I look like?'  It was rather magical to see her tranformation overnight.  It was as though Miss Swiss knew that I was pissed off with her, so she seek help from Mr. Refrigerator and the latter eventually helped her with the makeover. Ha ha, so dramatic!

Anyway, nonsense aside, I would say the taste of the roll is fairly good.  Not too sweet.  The orange flavour is apparent.  Indeed, orange always goes perfectly well with cream.  In a nutshell, as far as the taste is concerned, everything just blends well.  Though the cake is visibly on the dry side (because I have overbaked it), thank God the cream filling  (I used 100% whipping cream) sort of saves the day in that it moistens the whole thing.  So, it is acceptably delightful once it is in the mouth.  Texture wise, it is rather soft and smooth, just that it is not fluffy.

So, here you go, the recipe.......

The Ingredient:
(I adapted from Hippomama's Kitchen)

A) The Cake 
     4  egg yolks
     70g  orange juice
     1 tbsp orange rind
     40g  vegetable oil
     70g  cake flour, sifted

     4  egg whites
     60g castor sugar

B) Cream Filling
     200g  whipping cream
     1 tbsp superfine sugar

Method:
1.  Preheat oven 180c.  Line the cake tray with parchment paper.
2.  In a bowl, whisk in egg yolk, orange juice, orange rind and vegetable oil
     till well combine.  Add in flour, mix well.
3.  In another bowl, beat egg whites till foamy, add sugar in 3 additions.
     Beat till stiff. 
4.  Fold in 1/3 of the meringue into egg yolk mixture, then pour this mixture into
     the balance of the egg white and fold till well incorporated.
5.  Pour  the mixture into the cake tray and spread evenly.  Knock a few times
     on the tabletop to get rid of big bubbles in the batter.
6.  Bake in preheated  oven for 12-15mins or till golden.
7.  Remove the cake from the oven and let it rest to cool.
8.  Remove the cake from the tray and invert it.  Tear out the baking paper.
9.  Spread the top of the cake evenly with cream filling.
10.Gently roll the cake and refrigerate it for at least 1 hour before serving.


 Bon Appetite!

Friday, September 6, 2013

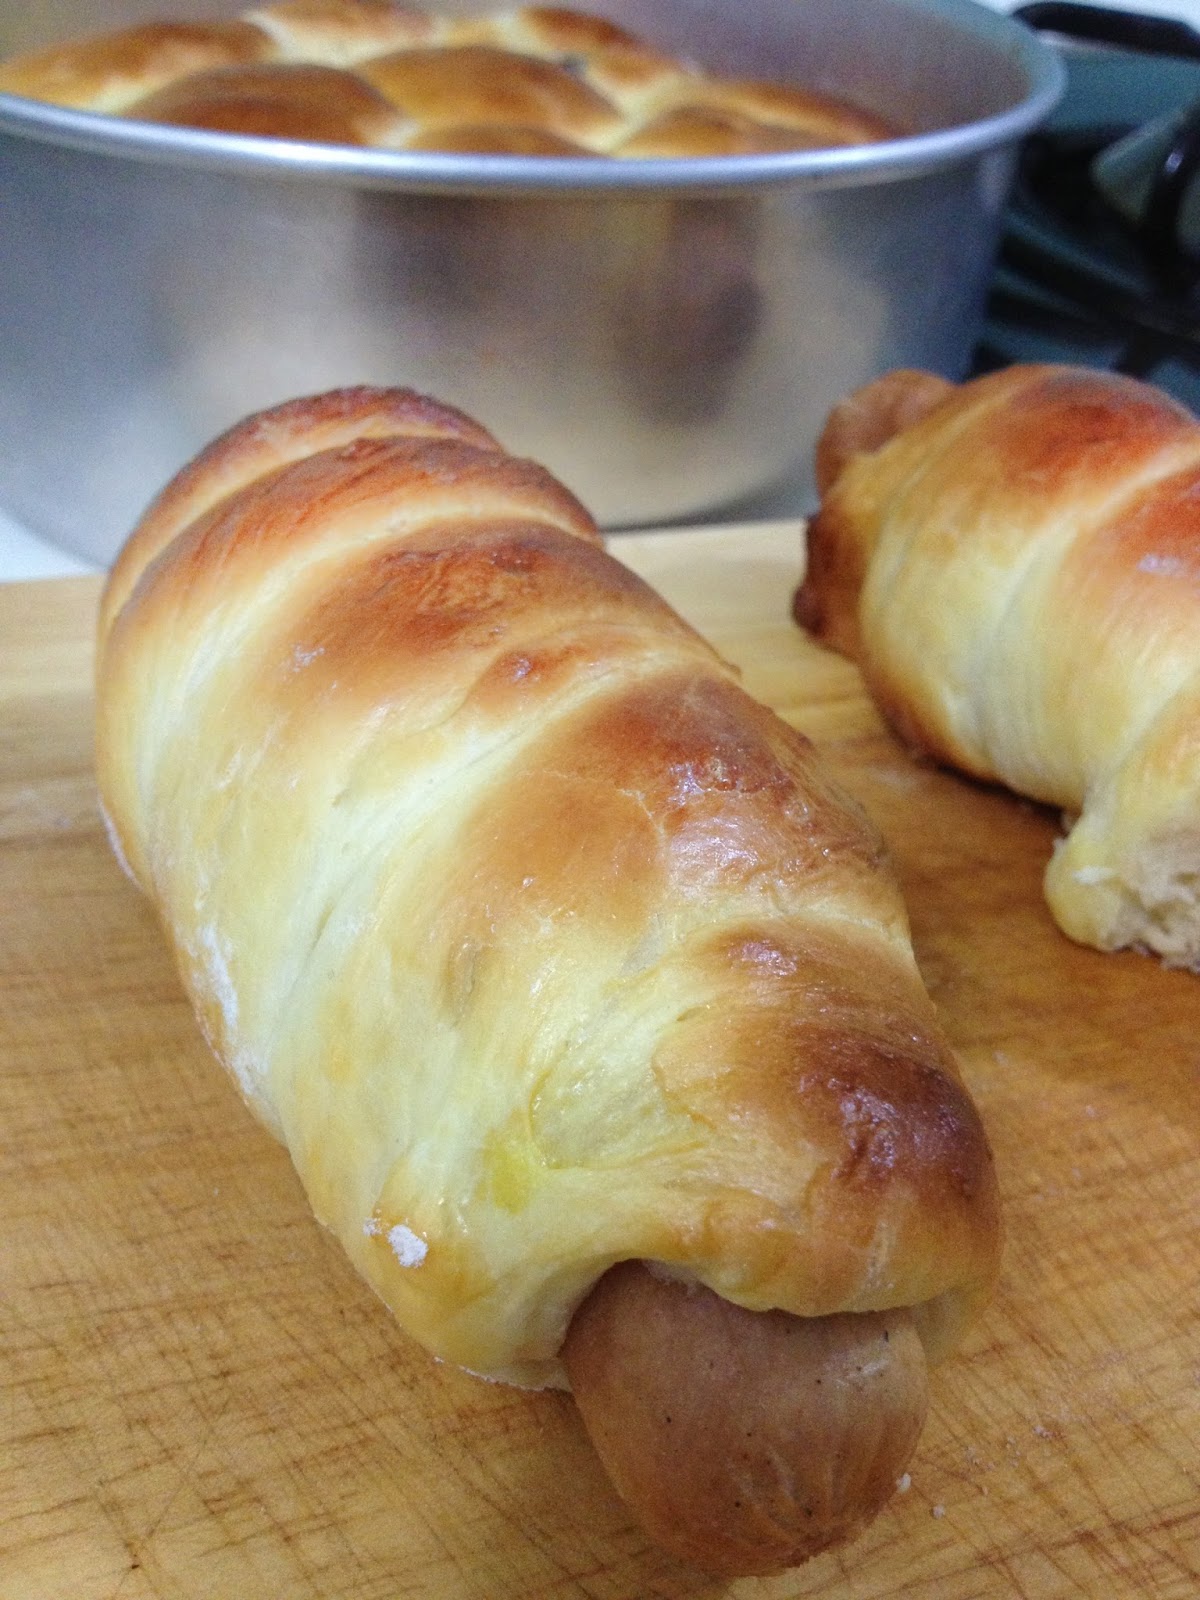
Super Soft Fluffy Bread


If you are overly crazy for soft cottony bread (well, not everybody loves soft bread, some just like it chewy), this recipe could be a keeper and worth bookmarking, thanks to Wendy of Table for 2....or more. 

I was raking my brain last weekend thinking of what to do or rather what to cook to fill my glorious Sunday when suddenly out of nowhere the idea of bread making struck me. Hey, why not? After all, I have been yearning and dying to make one my own. I have never personally experienced playing around with yeast and witness (well at close range) how this microorganism affects the dough. I have always admired with envy how bakeries make such soft fluffy breads.  To me, only bakeries would be able to make that, definitely not amateur like me until I read somewhere that any Tom Dick and Harry can make good bread, of course if given a good recipe.

All excited, I hunted for the recipes through the net.  Among the lot, I finally chose Wendy's, simply for the fact that she presented it in such a straightforward easy-to-follow manner.  Also, her recipe called for coffee creamer.  That sounded unique to me. The last thing was she boldly described her breads as 'wonderfully soft'. Oh, how on earth could I resist that??

So, after breakfast that Sunday, off I went driving around Malacca town, 'chaperoned' by my wife, son and daughter hunting for the ingredients.  Sad to say, not all supermarkets in Malacca sell bread flour.  Seemed that I might have to get it from a cake ingredient shop.  Again, not all shops are open on a Sunday.  Grrrr!  Frustration set in.  At last, I managed to get it from Yami Bake House. When I asked for bread flour, the lady boss was kind enough to recommend me Japanese high protein bread flour.  When I asked her for the differences (between this and the normal bread flour), she was again kind enough to share her knowledge, at great length.  She went on and on so willingly until I was lost and could not make head or tail of what she was rattling about.  Reason?  It was all in Mandarin!!  But one thing I could make out for sure, the flour is presumably much better!!

At home, I checked all the ingredients needed and I soon realized, hey where's the coffee creamer??  I don't store creamer at home.  Cleverly, I scavenged the kitchen drawers and to my delight, I saw quite a few plastic bags containing sachets of sugar, coffee, tea, cereal including creamer.  There were loads of them, all in different colours and logos.  Wow!  What a great collection!  Ahh, to all you ladies out there, especially Asian Chinese, stop pretending!  I'm sure you know what I mean here, in particular where those things might have come from!  I took many sachets with all of them bearing a big yellow 'M' on it.  Whatever it is, thanks to my wife for saving the day!


So, the remaining process of the bread making experience was pretty easy and smooth sailing especially with the dough proofing very beautifully.  The end result was satisfying too. The bread was really fluffy and as what Wendy had described it - wonderfully soft!  

However, one setback was the dough gave out quite a strong unpleasant 'yeasty' smell that freaked my son out.  As expected, he just stayed away from the kitchen for a while and dared not taste the bread.  $#%$@#!!!  The whole house smelled like unwashed shoes and stinky socks.  Then, I checked out in the net and discovered that I could have overproofed the dough.  Eerrm, is it true?  Well, it could be because apparently I had left it sit for more than 4 hours while I went out shopping.  The second setback, I had overbaked the bread just a little too long causing some to be slightly burnt.  However I tried to edit the 'burnt' photos with my photo editor application, the effort was just futile. 


Sigh!!  Never mind-lah, first time!  So, here goes the recipe.....

The Ingredients:

(A) 
310 bread flour (I used high protein bread flour)
60g  cake flour
40g coffee creamer (coffeemate)
70g sugar
2 tsp instant yeast


(B)
115g  milk
1 egg
2 egg yolks

(C)
1/3 tsp salt
40g butter

(D)
1/2 egg mixed with 1 tsp water

Method:
1. Combine (A) together.  Mix it around to combine. 
2. Combine (B), pour into (A) and knead to form a dough.
3. Put (C) into the dough and knead until a smooth dough is formed 
    (I gave this a 15 min knead by hand)
4. Cover the dough and let it proof until it doubles in size
5. Punch down and knead for another 1 minute.
6. Divide dough into 50 or 60g pieces each. 
7. Wrap each piece of dough with preferred fillings
8 Let dough proof until double again and brush (D).  Bake in a preheated oven at 170/190C for 15 
   minutes or until golden brain. 


 HAPPY BAKING!!

Friday, August 30, 2013

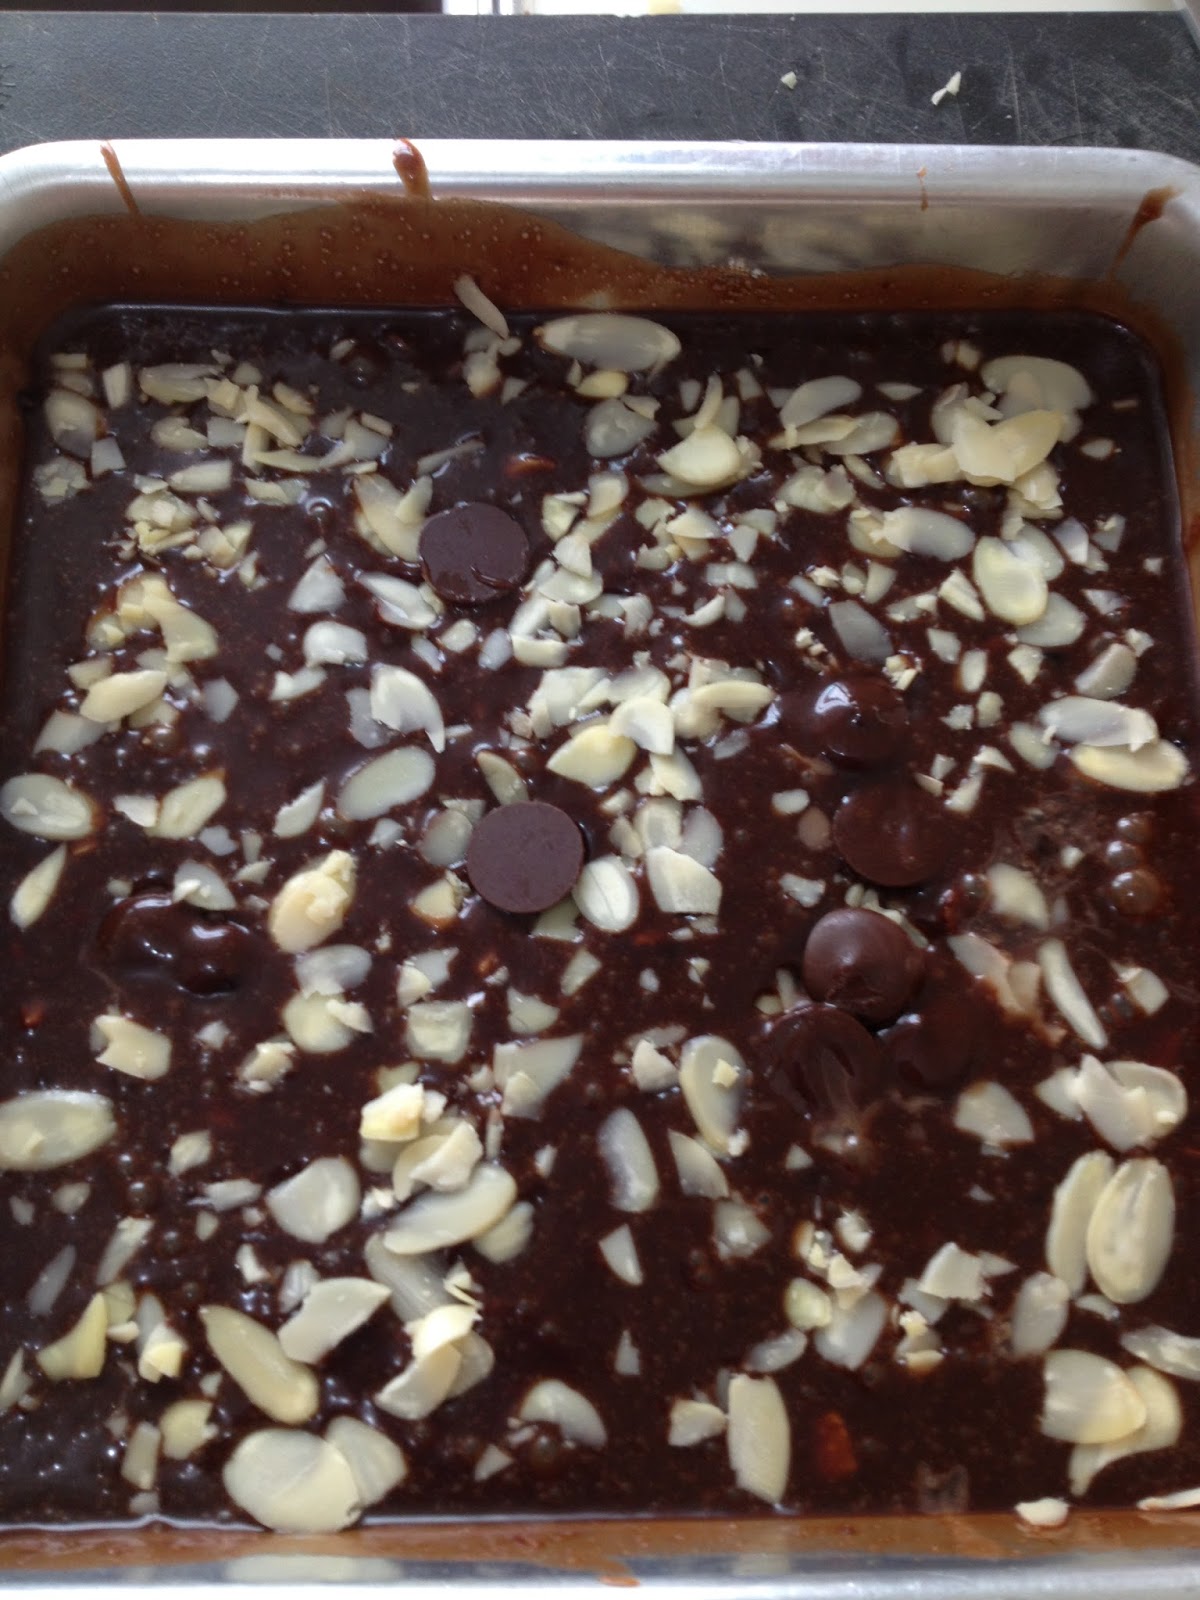
Fudgy Chocolate Almond Brownie


Basically, for those who are a newbie in baking like me, you may ask what is exactly the difference between a brownie and a cake?  Well to start it off, a brownie is a cross between a cake and a cookie.  To put it simply, it is flatter, denser and fudgier as compared to a cake which is taller and fluffier.

Brownies comes in a variety of forms, depending on its density.  Primarily, they are either the cakey type or the fudgy type.  Again, it all depends on personal preference.   For me?  I would choose the latter, and the gooier, the better.

Interestingly, there are some myths leading to the creation of this version of cake dessert. The first, that a chef accidentally added melted chocolate to biscuit dough.  The second, a cook forgot to add flour to the batter.  And the third, also the most popular belief, that a housewife who was baking a chocolate cake forgot to add baking powder.  When her cake did not rise, instead of tossing it out, she went on to serve the flat pieces to her guests.  This became a beloved treat of today.  Whatever may be the case, all three myths have lead to the 'birth' of this sweetie which eventually gained its very own popularity among cake lovers.

So, based on these myths, they sort of self-explain the distinct texture of a brownie: 

1. The higher ratio of butter to flour - makes the dessert
     fudgier and denser. 
2. The absence of baking powder - makes the cake flat.
3. The higher ratio of sugar used - makes the brownie gooier. 
4. The extra melted chocolate - makes it devilishly and sinfully chocolatey

This is my first time baking a brownie.  Personally, I find baking this treat relatively simple as compared to a cake.  Thank God, for once I don't have to bother whether the mixture is over beaten or under beaten.  I also need not care whether the ingredients are at room temperature or not, or whether the eggs are soft peak, stiff peak, hard peak or no peak!  The best part is, there is no mixer required, be it the stand one or the hand one.  It's pretty straightforward, just add and mix.

I adapted this recipe from Wendy of Table for 2....or more.  I deliberately added 20g of coffee powder to give the dessert the extra kick.  Indeed, the coffee gave a tinge of sweet-bitter taste.  Generally, I am quite pleased (though not totally satisfied) with the outcome considering this is my first time trying my hands out at this bake.  The only setback is the whole thing was not dark, gooey, fudgy and moist enough. 

After making the cake, I went on to scour through the net about the perfect brownie and incidentally this blog here from Eva Bakes piqued my interest.  It seems that she has made quite a few variations of brownies and all of them looked so amazingly tempting - dark, moist, gooey and fudgy! 

Anyway, here's the recipe I used.....

The Recipe:
250gm dark chocolate
100gm butter
100gm sugar (I find it a little tad too sweet, so pls reduce accordingly)
1 tsp vanilla extract
20g coffee/espresso powder
3 eggs
60gm all purpose flour
100gm chocolate chips
100gm white chocolate chips (I do not have any, so I use the chocolate one, so altogether 200g of chocolate chips)
Small handful of almond (optional)

Method:
1. Preheat oven at 140/160C. Line an 8 inch shallow
    square pan.
2. Place dark chocolate and butter into a mixing bowl.
    Place mixing bowl over another bowl of hot water and let the butter and chocolate melt,
    stirring gently.
3. Remove mixing bowl from hot water and mix in sugar, vanilla extract and coffee powder.
4. Put in eggs and mix.
5. Sift in flour and mix.
6. Put in 2/3 of both choc chips and nuts and mix.
7. Pour batter into pan and sprinkle balance of almond nuts and choc chips.
8. Bake for 35- 40 minutes or until skewer comes out clean.
 

Happy Trying!!

Saturday, August 24, 2013

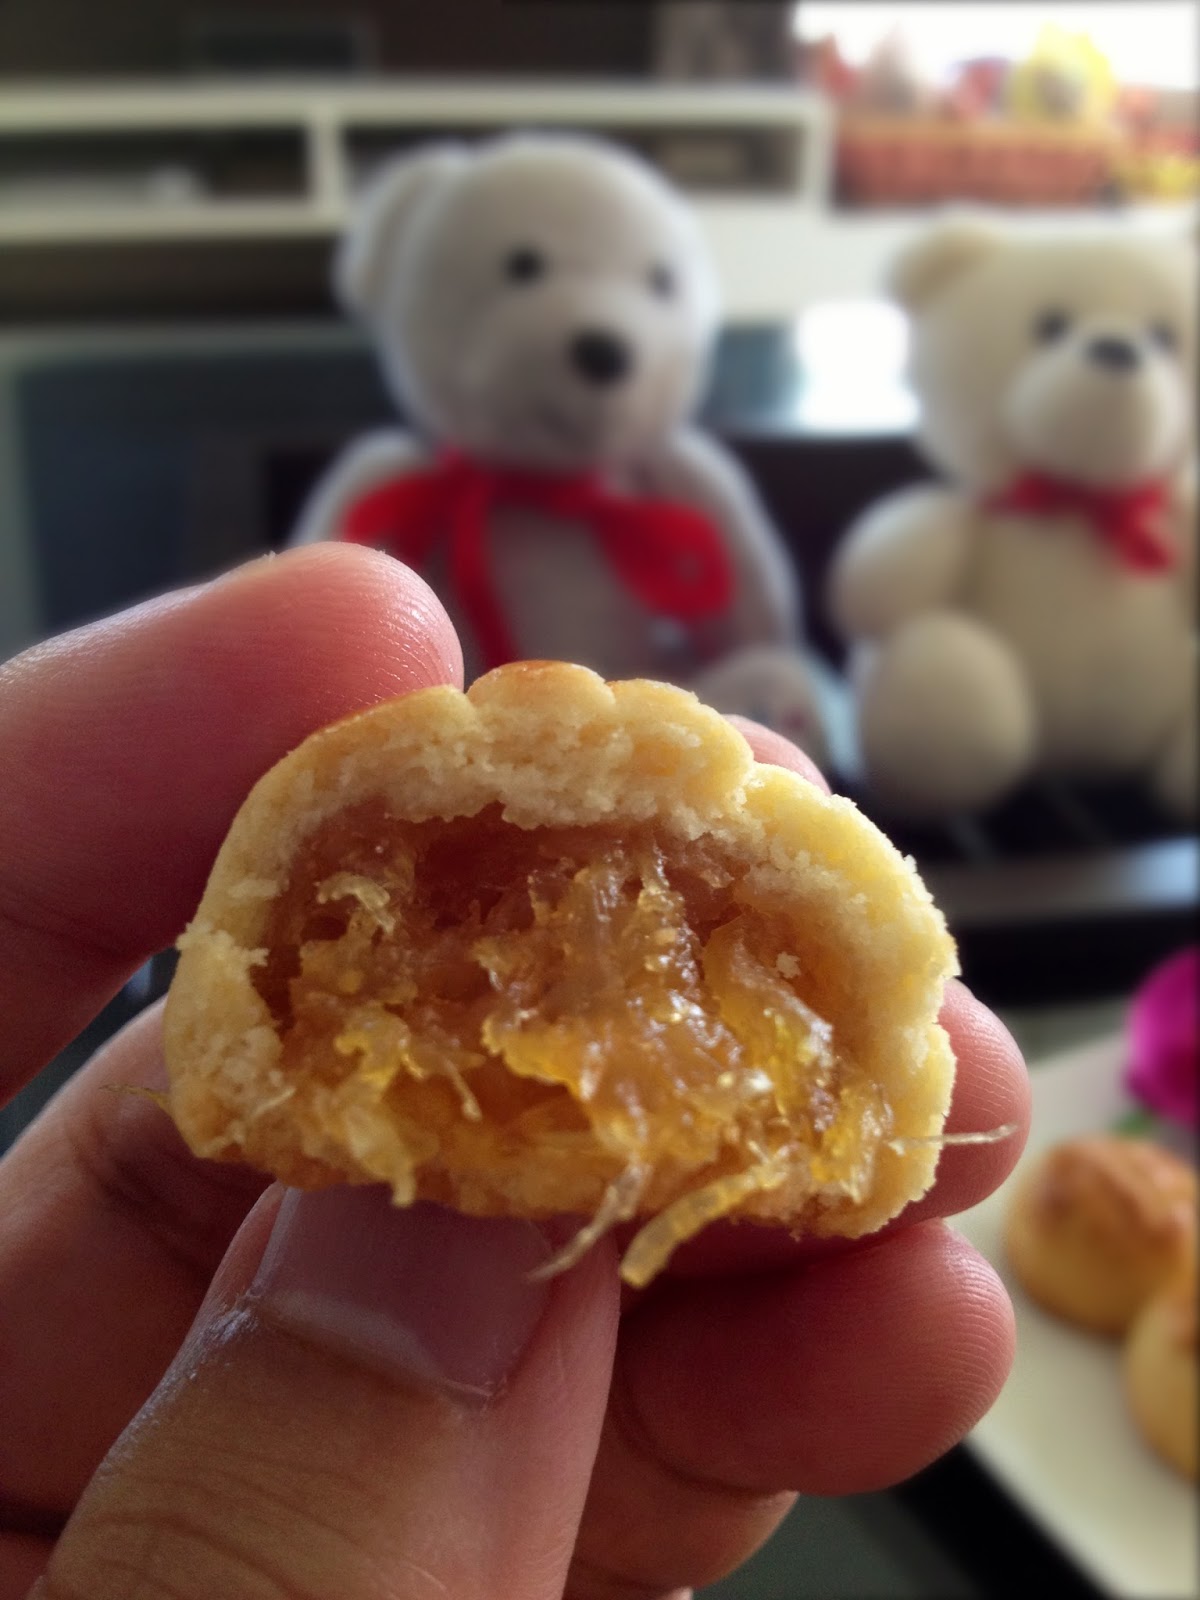
Melt-in-the-mouth Pineapple Tarts - Enclosed Version


Barely two months after I last blog about pineapple tarts, here I come again, with another version of this glorious sweetie!  This time round, it is the enclosed type.

Having grown  up eating loads and loads of homemade traditional Nyonya pineapple tarts which characteristically has its filling exposed, this bull-headed soul was just too dogged to recognize any other variations of the tart.  He was just too arrogant to even try them and to him, as though the open type was the ONLY one existed in this whole wide world. 

Thus, it comes to no surprise if I say this is my first time eating this version of pineapple tarts, apart from the Taiwanese Pineapple Cake which coincidentally also has its filling enclosed.

Taiwan Pineapple Cake
Malaysia Pineapple Balls
Thanks to Sonia of Nasi Lemak Lover, whose excellent and insightful posting on the enclosed version of the tart finally tamed down my arrogance and brought me a step closer into the realm of pineapple world.

What drew me into reading her posting and experimenting the tarts myself were basically because of these two factors:

  a) it is super-duper straightforward which only calls for four ingredients, yes ONLY 4, and they 
      are bu---, con----, f----- and e---.

  b) it is the best melt-in-the-mouth pineapple tart version though you may have your melt-in-
      the-mouth recipe

Huh?? Sure or not, Sonia??  Well, after taking my first bite, I would have to take my hat off.  You are absolutely correct!  The tarts are freaking melty!  Unquestionably, it is by far the best that I have ever tasted, too!


So, here it is, the secret reveals.....

Ingredients:

350g butter
100g condensed milk or sweetened creamer
510 plain flour
2 egg yolks

700g pineapple filling (homemade or store-bought).
You may find the recipe in my previous post here if you intend to make your own.

1 egg yolk + 1 tsp milk, for egg wash

Method:
1. Cream butter and condensed milk till light.
2. Add in egg yolk one at a time, and beat until combine.
3. Mix in flour to make a dough. Make sure it's not sticky.
4. Refrigerate for about 30 minutes.
5. Meanwhile, roll pineapple filling into balls
6. Flatten a piece of dough and place a ball of the rolled pineapple 
    filling in the middle.  Bring the edges of the dough together and 
    press lightly to seal.  Gently roll the ball on the surface of your
    table top so that the surface of the ball is smooth and neat.
7. Glaze the rolled balls with egg wash.
8. Bake in the preheated oven at 165C (fan forced) for about
    20 mins or till golden brown.
9. Cool completely before storing.


Happy baking!

Friday, August 9, 2013

Raisin-Almond-Orange Streusel Cake


This is my first time baking a streusel cake.  Obviously, the word itself was so alien to me when I first heard it.  It sounded so English that I thought it was some kind of a candy or even a name of a branded shoe. Or could it a type of gardening tool or some dog breed? Oh my God! There goes my apish ignorance!

I bet that most of us have eaten a streusel or at a very least seen it before but not knowing what it is called.  After some read-ups, I came to know that basically streusel is a crumblike topping for coffee cakes and rich breads, consisting of flour, sugar, butter, cinnamon, and sometimes chopped nutmeats.  Streusel is indeed a German word which means 'something scattered or sprinkled'.  True enough, this sugary crumbs are generously scattered on top of the cake giving the whole cake a tinge of sweetness.  If you have weakness for butter, then this little something will without fail pamper your taste buds to the max. 

Surprisingly, my son who normally has no craving for cakes sort of like this bake a lot.  Personally, I find this cake so-so as I do not like the sourish zing from the raisins.  Probably, I have over-soaked the raisins causing it to lose its sweetness.  The only thing that has made up for the flaw is the streusel topping.  The buttery and sugary crunch from the topping is simply satisfying and indeed completes everything. 

This cake will be perfect to go with a cuppa hot coffee on a hot afternoon in a private garden enjoyed together with a bunch of close friends or family members.  Aaahhh.....heavenly! 


For those who want to give this dessert a shot, here's the secret......

The Recipe

A) Batter
     55g unsalted butter, at room temperature
     100g brown sugar (1/2 cup)
     1 large egg, at room temperature
     125g all-purpose flour (1 cup)
     1/8 teaspoon salt
     1 tsp baking powder
     1/2 cup orange juice
     1/2 cup raisins, soaked and drained
     small handful almond flakes


B) Streusel
      60g all-purpose flour (1/2 cup)
      55g cold, unsalted butter, chopped into small pieces
      55g caster sugar (1/4 cup)

Method:

Preheat your oven at 175C degrees and butter a 8-inch square pan.

In a medium bowl, combine the flour, baking powder, and salt and stir to blend. 

In another, larger bowl, beat the sugar and butter together until they become creamy and fluffy. Add the egg and vanilla extract and beat well. 

Add half of the flour mix into the egg-butter-sugar mix, bit well, then add half the orange juice and beat again.

Do the same with the remaining half flour mix and orange juice (and zest if you are using it). Beat the mixture until it is smooth. Stir in the raisins. Spread the mixture evenly in the prepared pan.

Make the Streusel
In a small bowl combine the flour, sugar, butter pieces and mix it with your fingers until it becomes crumbly.

Sprinkle evenly over the batter in the pan and stud with the almond flakes. 

Bake the cake for 20-30 minutes or until it is golden brown. Test with a toothpick to see if it is ready, if the toothpick comes out clean it is ready. 

Let it cool in the pan for 10 minutes and then unmold and serve warm or at room temperature.


Enjoy!!


Thursday, July 25, 2013

Ayam Buah Keras (Candlenut Chicken)


I never know that candlenuts can become one of the main ingredients in a dish.  As far as I know, candlenuts (or in Malay it is called buah keras) are used in traditional Asian dishes (mainly in Malaysia and Indonesia) to thicken sauces ie satay and sambal.  The nut is similar in flavour (though much bitter) and texture to a macadamia nut, which similarly has a high oil content.

Buah Keras / Candlenuts

The other day, I was browsing through for a nyonya chicken curry recipe that my late mother used to cook for me and incidentally I stumbled upon this one over here from My Kitchen Snippets.  At one glance, it looked similar to the recipe that I was looking for.  I clicked, went in and instantly had my heart set on cooking this dish, of course still assuming that it was THE recipe I was looking for.

However, in the midst of preparing the dish, I realized that I was cooking something else.  While dishing out onto the plate, I knew that it's gonna be a good one, based on the texture, consistency, color and aroma.

Then came the moment of truth!  My wife took her first bite..........mmm, okay-lah, cukup rasa (tasty enough)!  As her usual self, always stingy with her compliments, I still could not assume the dish had convinced her.........U-N-T-I-L she took the second piece.  PHEW!!  I gave out a small sheepish smile.

In the evening, on the dining table, my eldest who had just come back from school tried the dish together with steamed rice.  After his last spoon, he went up straight to my wife and blurted out..........."mummy, can you please ask papa to cook some more?"   


So, here it is, two 'likes' from two of the most important people in my family.  Humbly, I have somehow succeeded in this dish that I feel it's worth trying if you are looking for a nyonya chicken dish.....yes, Ayam Buah Keras/Candlenut Chicken.

The Recipe:

The ingredients:

Kaffir Lime Leaves
600g chicken, cleaned and cut into small pieces
Candlenut paste (please refer to the recipe below)
1 Lemongrass, slightly smashed
2 pcs Kaffir lime leaves
3/4 cup of water
Salt to taste
Sugar to taste


Method:
1. Heat about 4-5 tablespoon of oil and put in the candlenut paste and fry
     until fragrant (this normally take about 10 minutes).  Use low to medium
     heat and be careful not to burn the paste.
2. Add in the chicken pieces, kaffir lime leaves and lemongrass  Coat the chicken
    with the paste and keep stirring until the chicken turns opaque.
3. Add in salt, sugar, and some water and stir every now and then.
4. Cook until the chicken is done and gravy thickens slightly.  If the chicken is not
    cooked but the gravy is starting to dry up, you can add more water.
5. Dish out and serve.

Preparing the Candlenut Paste:
   100g fresh chilies (about 10 pcs)
   5 candlenuts
   100g shallots (about 10-12 pcs)
    8g fresh turmeric/kunyit hidup (about 2 inches)
    10g shrimp paste/belacan
    oil
    water

Method:
1. De-seed the fresh chillies if you do not like the paste to be too spicy.
    Cut the chillies, shallots and turmeric for easy blending.
2. Put all the ingredients into a blender and add a little water.  Blend
    into fine paste and set it aside.

BON APPETITE!

The nut is similar (though “rougher”) in flavor and texture to the macadamia nut, which has a similarly high oil content. - See more at: http://theepicentre.com/spice/candlenut/#sthash.cVQyqKJU.dpuf
The nut is similar (though “rougher”) in flavor and texture to the macadamia nut, which has a similarly high oil content. It is mildly toxic when raw. - See more at: http://theepicentre.com/spice/candlenut/#sthash.cVQyqKJU.dpuf